Quick Answer: This DIY pain relief salve recipe combines herb-infused oil and beeswax using a simple double boiler method. The core ratio is 1 cup of infused oil to 1 ounce of beeswax. Active prep takes about 15 minutes once your infused oil is ready, and the finished salve keeps for up to 1-3 years in a cool, dark spot.
Key Takeaways
- The standard formula is 1 cup herb-infused oil + 1 oz beeswax — this is your starting point [2]
- Best herbs for pain relief: comfrey, calendula, plantain, and oregano grape root [5][6]
- Use a double boiler on low to medium heat to avoid scorching [2][4]
- Test consistency with the cold spoon method before pouring into jars [3][7]
- Add 10-20 drops of essential oil (lavender, frankincense) after cooling to 120°F [3][8]
- Adjust firmness: less oil = firmer balm, more oil = softer salve [2]
- Store in glass jars or metal tins and label with the date [3][5][8]
- Shelf life is 1-3 years when stored properly [3][4][8]
- You can enrich the base with 1-2 Tbsp shea or cocoa butter for a creamier texture [2]
- This salve works well for sore muscles, stiff joints, and everyday aches [1]
What Exactly Is a Pain Relief Salve, and Is This Recipe Right for You?
A pain relief salve is a solid or semi-solid topical balm made from infused herbal oil and beeswax. You apply it directly to skin over sore muscles or stiff joints, and the herbs and oils absorb slowly for localized comfort.
This recipe is a good fit if you:
- Prefer natural, ingredient-transparent alternatives to store-bought creams
- Deal with regular muscle soreness, joint stiffness, or minor aches
- Enjoy simple, hands-on kitchen projects
It’s not a replacement for medical treatment. If you have a serious injury, chronic pain condition, or broken skin, check with a healthcare provider before using any topical herbal remedy. Also skip this if you have a known allergy to beeswax, any of the herbs listed, or nut-based butters.
What Ingredients Do You Need for This DIY Pain Relief Salve Recipe?
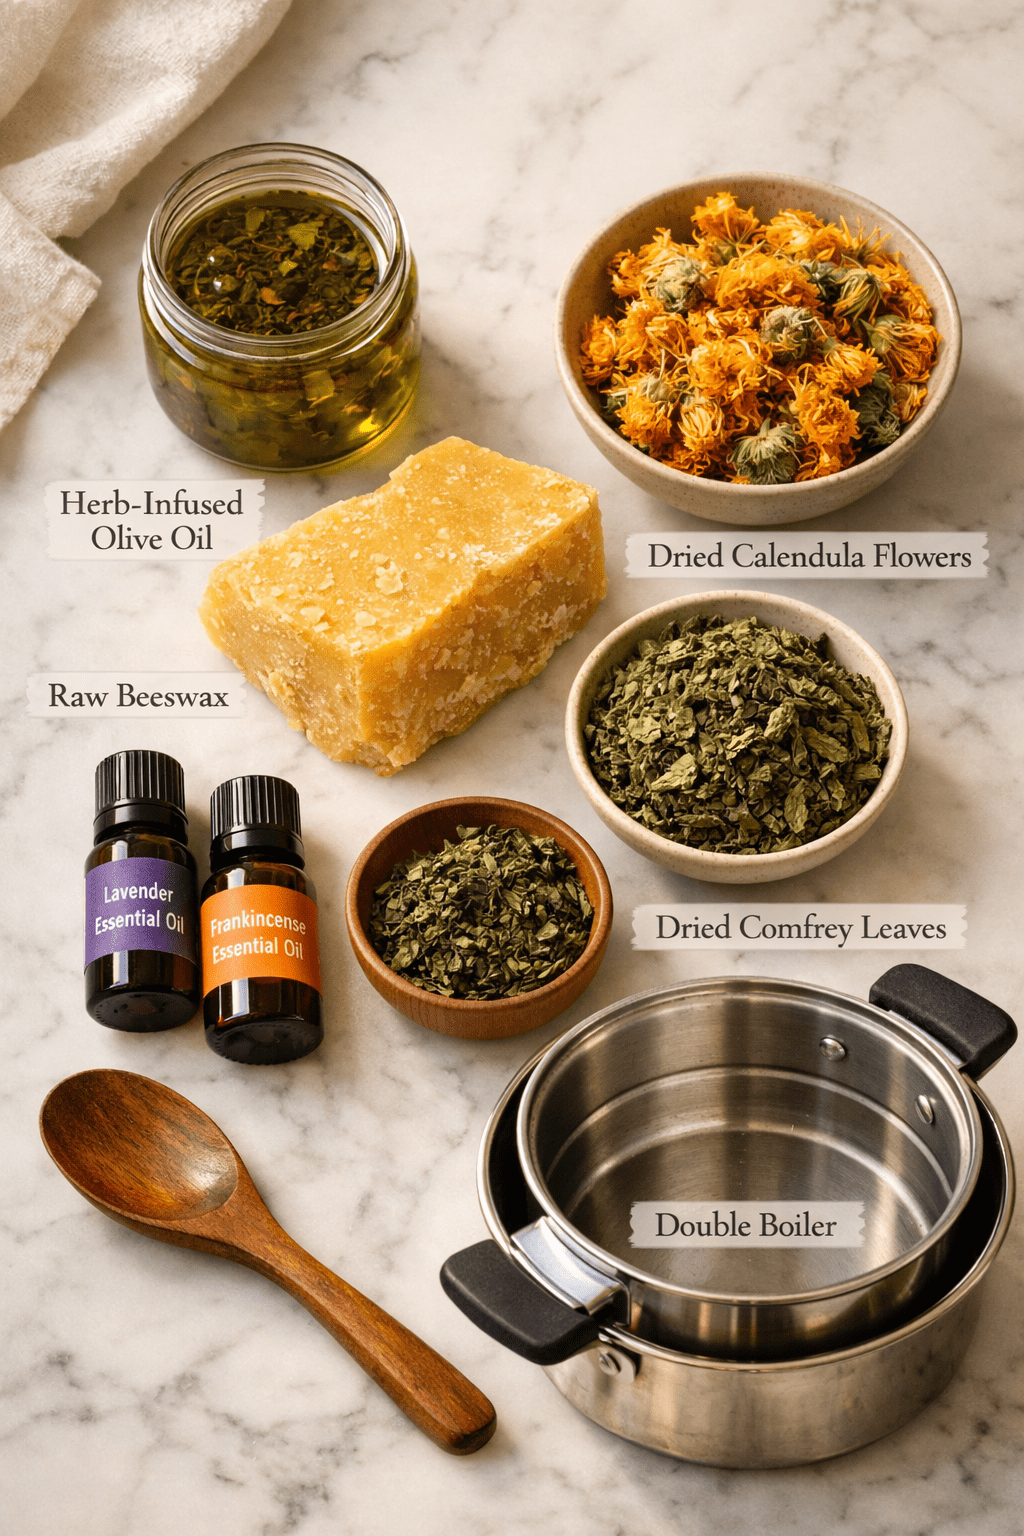
You need three core ingredients and a few optional add-ins. Here’s a clear breakdown:
Core Ingredients
| Ingredient | Amount | Purpose |
|---|---|---|
| Herb-infused oil (olive, coconut, or jojoba) | 1 cup | Carrier + herbal benefits |
| Beeswax (pellets or grated block) | 1 oz (about 2 Tbsp) | Sets the salve solid |
| Essential oils (optional) | 10-20 drops | Extra therapeutic effect |
Best Herbs for Pain Relief
The most recommended herbs across multiple sources are [5][6]:
- Comfrey — traditionally used for sore muscles and bruises
- Calendula — gentle, skin-soothing, widely available
- Plantain leaf — cooling and anti-inflammatory properties
- Oregano grape root — used for deeper tissue discomfort
Optional Enriching Add-ins
- 1-2 Tbsp shea butter, cocoa butter, or mango butter — adds a creamier, more luxurious texture [2]
- Vitamin E oil — a natural preservative that also nourishes skin
Choose X if: You want a firmer balm (like a lip balm stick), use only ¾ cup oil. For a softer, more spreadable salve, go up to 1.25 cups of oil [2].
How Do You Make the Herb-Infused Oil First?
The infused oil is the foundation of this recipe, and it does require some advance prep. The good news is that once it’s made, the actual salve assembly takes under 15 minutes.
Two methods:
- Slow cold infusion (best quality): Place dried herbs in a clean jar, cover completely with oil, seal, and leave in a warm sunny spot for 2-6 weeks. Shake daily. Strain before using.
- Quick heat infusion (ready in hours): Combine dried herbs and oil in a double boiler or slow cooker on the lowest setting. Heat gently for 4-8 hours, then strain through cheesecloth.
Common mistake: Using fresh (wet) herbs. Fresh herbs contain moisture, which can cause mold to grow in your oil. Always use dried herbs [6].
For a related topical remedy you can make just as quickly, check out this DIY warming muscle rub recipe that uses a similar base.
Step-by-Step: The DIY Pain Relief Salve Recipe (15 Minutes)
Once your infused oil is ready, here’s the full process [1][2][4]:
What you’ll need:
- Double boiler (or a heatproof bowl over a saucepan)
- Kitchen scale or measuring cups
- Wooden spoon or silicone spatula
- Cold spoon or small plate (for testing)
- Glass jars, metal tins, or lip balm tubes
Steps:
- Set up your double boiler. Add 2-3 inches of water to the bottom pot. Place the top pot or heatproof bowl on top. Heat over low to medium heat. Do not cover the pot — condensation can ruin the salve’s texture [2].
- Add beeswax. Place 1 oz of beeswax pellets (or grated beeswax) in the top pot. Let it melt slowly, stirring occasionally.
- Pour in the infused oil. Once beeswax is mostly melted, add 1 cup of your herb-infused oil. Stir gently until fully combined.
- Add butter (optional). Stir in 1-2 Tbsp of shea or cocoa butter now if using [2].
- Test the consistency. Dip a cold spoon into the mixture and place it in the freezer for 1-2 minutes. If it’s too soft, add a little more beeswax. Too firm? Add a splash more oil [3][7].
- Cool slightly, then add essential oils. Remove from heat. Let the mixture cool to around 120°F (it will still be liquid). Add 10-20 drops of essential oil and stir well [3][8]. Good choices: lavender, frankincense, or peppermint.
- Pour into containers. Carefully pour into your jars or tins. Don’t move them until fully set (about 30-60 minutes at room temperature).
- Label and store. Write the date and contents on each container [3][5][8].

How Do You Know If Your Salve Turned Out Right?
A properly made salve should be firm enough to hold its shape at room temperature but soft enough to melt slightly on contact with warm skin.
Signs it worked:
- Smooth, even surface with no cracks or separation
- Melts easily when rubbed between fingers
- No oily puddle forming at the bottom of the jar
Troubleshooting:
| Problem | Likely Cause | Fix |
|---|---|---|
| Too soft/oily | Not enough beeswax | Remelt and add more beeswax |
| Too hard/waxy | Too much beeswax | Remelt and add more oil |
| Grainy texture | Cooled too fast or stirred too much | Remelt slowly and pour without stirring |
| Moisture droplets | Condensation from lid or wet herbs | Discard and start fresh with dry ingredients |
The cold spoon test before pouring is the single best way to avoid wasting a whole batch [3][7].
If you enjoy making targeted topical remedies, you might also love this DIY headache balm recipe that uses a similar quick-set method.
How Long Does a Homemade Pain Relief Salve Last?
Properly stored salves last 1-3 years, with peak potency in the first 12-18 months [3][4][8].
Storage tips:
- Keep in a cool, dark location away from direct sunlight and heat
- Glass jars and metal tins both work well [3][5][8]
- Always use clean, dry fingers or a small spatula to scoop — moisture shortens shelf life
- If the salve smells rancid or changes color significantly, discard it
Edge case: If you used coconut oil as your carrier, the salve may melt in warm climates. Store in the fridge during summer or switch to a higher-melt oil like olive or jojoba.
For those dealing with specific types of discomfort, this DIY menstrual cramp salve guide covers targeted variations worth bookmarking.
What Are the Best Essential Oils to Add for Pain Relief?
Essential oils are optional but add meaningful therapeutic benefit when used correctly. Add them only after the salve cools below 120°F to preserve their active compounds [3][8].
Top choices:
- Peppermint — cooling sensation, good for muscle tension
- Lavender — calming, works well for general soreness
- Frankincense — traditionally used for joint discomfort
- Eucalyptus — warming and penetrating, pairs well with comfrey oil
Use 10-20 drops total per cup of oil. Don’t exceed this — essential oils are concentrated and can irritate skin in high amounts.
You can also explore natural sinus chest rub recipes if you want to adapt this same base formula for respiratory comfort.
FAQ: DIY Pain Relief Salve Recipe
Q: Can I use coconut oil instead of olive oil?
Yes. Coconut oil works well but has a lower melting point, so your salve may soften in warm temperatures. Olive oil produces a more stable salve in most climates.
Q: Do I have to use beeswax, or are there vegan alternatives?
Carnauba wax or candelilla wax are common vegan substitutes. Use slightly less than the beeswax amount called for, as they tend to set firmer.
Q: Can I apply this salve to broken skin or open wounds?
No. This salve is intended for intact skin over sore muscles and joints. For wound healing, see a healthcare provider or look into wound-specific herbal formulas.
Q: Is this safe for children?
Some essential oils (especially peppermint and eucalyptus) are not recommended for young children. Use a plain herb-infused salve without essential oils for kids, and check with a pediatrician first.
Q: How much does it cost to make?
Costs vary by ingredient source, but a basic batch using olive oil, dried calendula, and beeswax typically runs $5-$15 for about 4-6 oz of finished salve — far less than most commercial alternatives.
Q: Can I make this without a double boiler?
Yes. A heatproof glass bowl set over a saucepan of simmering water works just as well. Avoid direct heat on the pot, which can scorch the oil and beeswax [2][4].
Q: What if I don’t have time to infuse oil for weeks?
Use the quick heat infusion method (4-8 hours in a slow cooker on low) or purchase pre-made herb-infused oil from a reputable herbal supplier.
Q: Can I add honey or aloe vera to the salve?
Honey and aloe vera are water-based, so they won’t blend smoothly into an oil-and-wax base. Adding them can cause separation and shorten shelf life significantly.
Conclusion
Making your own pain relief salve is genuinely straightforward once you have your infused oil ready. The core DIY pain relief salve recipe — 1 cup herb-infused oil, 1 oz beeswax, and your choice of essential oils — gives you a clean, effective topical remedy you can customize to your needs.
Your next steps:
- Start your infused oil today using dried calendula or comfrey and olive oil.
- Gather your supplies — a double boiler, glass jars, and a kitchen scale.
- Make your first batch using the step-by-step process above.
- Label it with the date and store it somewhere cool and dark.
- Adjust the formula on your next batch based on how firm or soft you want the final texture.
If you enjoy making natural remedies at home, explore more recipes like this DIY headache balm or browse the full natural remedies collection for more ideas. And if you’re just getting started with herbal DIYs, the beginner’s guide to natural remedies is a great place to build your foundation.
References
[1] Watch – https://www.youtube.com/watch?v=Rb92YoT-OEQ
[2] Make Salve Or Balms Recipe 101 – https://homesteadandchill.com/make-salve-or-balms-recipe-101/
[3] DIY Herbal Salves – https://blog.mountainroseherbs.com/diy-herbal-salves
[4] In The Garden A Recipe For Relief – https://tetonfamilymagazine.com/in-the-garden-a-recipe-for-relief/
[5] DIY Herbal Salves – https://www.healthline.com/health/diy-herbal-salves
[6] How To Make Herbal Salves – https://www.learningherbs.com/blog/how-to-make-herbal-salves
[7] How To Make Salve – https://www.herbalreality.com/herbalism/home-herbalism/making-medicines/how-to-make-salve/
[8] Homemade Wound Healing Salve Recipe – https://melissaknorris.com/homemade-wound-healing-salve-recipe/