
I’ll be honest with you: cellulite is completely normal, and there’s no magic cream that makes it vanish overnight. But if you’re looking for a natural way to improve the appearance of your skin’s texture and give yourself some self-care time, making your own DIY anticellulite cream can be a satisfying project. While scientific evidence for homemade formulations is limited, many people enjoy the ritual of massaging these creams into their skin and report temporary improvements in how their skin looks and feels.
Key Takeaways
- DIY anticellulite creams won’t eliminate cellulite, but may temporarily improve skin texture and appearance when combined with massage
- Coffee grounds, coconut oil, and certain essential oils are popular ingredients, though scientific support for their effectiveness is limited
- The massage technique you use while applying the cream may be just as important as the ingredients themselves
- Homemade creams are significantly cheaper than commercial products and let you control exactly what goes on your skin
- Results, if any, are temporary and require consistent application over several weeks
- Store homemade creams in the refrigerator and use within 1-2 weeks to prevent spoilage
- If you want more dramatic results, professional treatments from a dermatologist may be more effective
Quick Answer
A DIY anticellulite cream combines ingredients like coffee grounds, coconut oil, and essential oils that may temporarily improve skin texture when massaged into areas with cellulite. While there’s limited scientific proof these homemade formulations eliminate cellulite, the combination of natural ingredients and massage technique can make skin feel smoother and more hydrated. The cream takes about 10 minutes to make and costs a fraction of commercial products, though results are modest and temporary at best.
What Is Cellulite and Can DIY Creams Actually Help?
Cellulite is the dimpled appearance of skin, usually on thighs, buttocks, and hips, caused by fat deposits pushing through connective tissue beneath the skin. It affects up to 90% of women at some point in their lives and is completely normal, regardless of body size or fitness level.
Here’s what you need to know about DIY creams and cellulite:
- No cream eliminates cellulite permanently because it’s a structural issue beneath the skin, not a surface problem
- Homemade creams may temporarily improve skin appearance by increasing hydration and circulation
- The massage action during application can reduce fluid retention and make skin look smoother for a few hours
- Consistent use over 4-8 weeks shows better results than occasional application
- Commercial creams with active ingredients show slightly better results in studies, but the difference is modest
Common mistake: Expecting permanent results from any topical cream. Cellulite is influenced by genetics, hormones, and skin structure, which creams can’t fundamentally change.
Choose DIY anticellulite creams if you want an affordable, natural option for temporary improvement and enjoy the self-care ritual. Skip them if you’re looking for dramatic, permanent changes (in that case, consult a dermatologist about professional treatments).
What Ingredients Work Best in a DIY Anticellulite Cream?
The most effective DIY anticellulite cream combines ingredients that may improve circulation, hydration, and skin texture. While scientific evidence for these ingredients is limited, they’re commonly used in both homemade and commercial formulations.
Core Ingredients
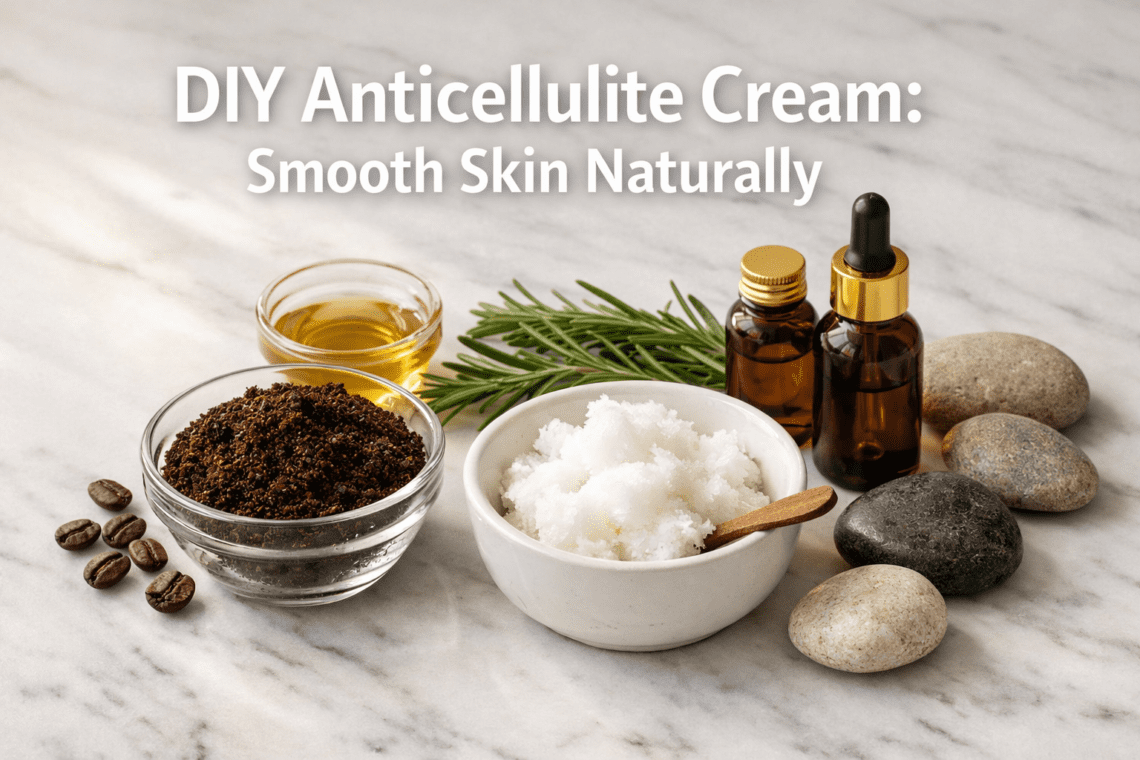
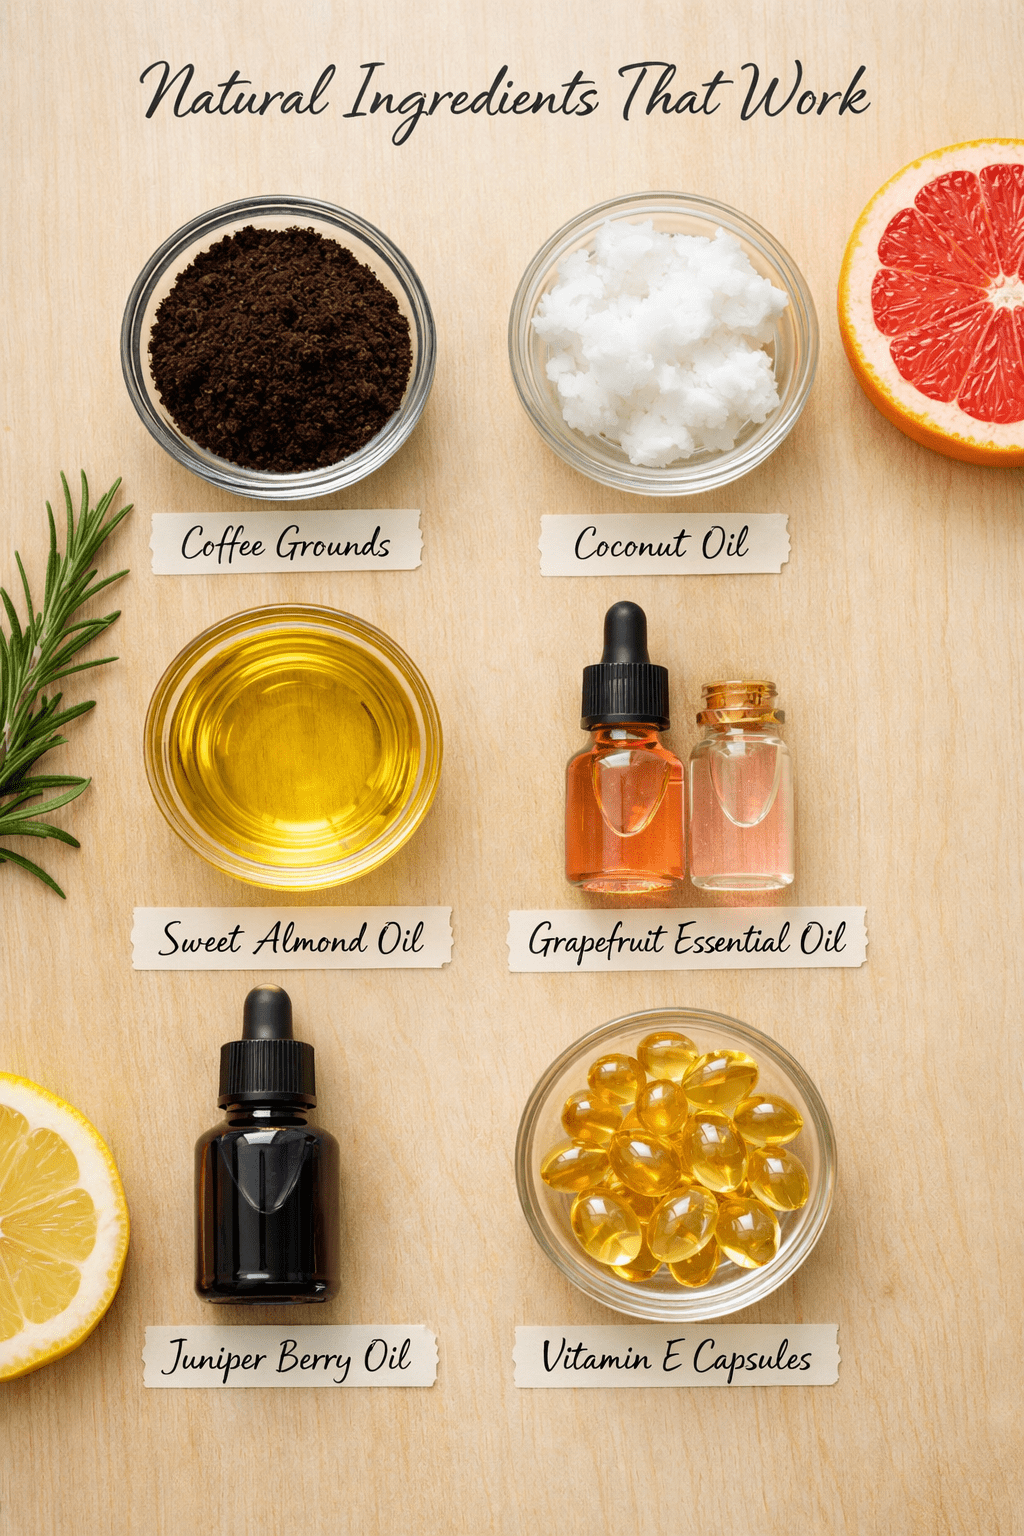
Coffee grounds (or caffeine)
- May temporarily tighten skin and reduce fluid retention
- Use finely ground coffee to avoid skin irritation
- Fresh grounds work better than used ones
Carrier oils
- Coconut oil: moisturizing but can be comedogenic for some skin types
- Sweet almond oil: lighter texture, absorbs quickly
- Jojoba oil: mimics skin’s natural oils, good for sensitive skin
- Choose based on your skin type and texture preference
Essential oils (use sparingly, 1-2% concentration)
- Grapefruit oil: may support circulation
- Juniper berry oil: traditional use for fluid retention
- Rosemary oil: may improve blood flow
- Always dilute properly to avoid skin irritation
Optional Boosters
- Vitamin E oil: antioxidant that may improve skin texture
- Shea butter: adds thickness and deep moisturization
- Beeswax: creates a thicker, more stable cream
- Aloe vera gel: soothing and hydrating
Edge case: If you have sensitive skin or allergies, patch test each ingredient separately on your inner arm before making a full batch. Essential oils, in particular, can cause reactions in some people.
For more natural skincare projects, check out our complete guide to DIY face masks for glowing skin.
How Do I Make a Basic DIY Anticellulite Cream?
Making a basic DIY anticellulite cream takes about 10 minutes and requires no special equipment beyond a mixing bowl and spoon. This recipe makes approximately 8 ounces, enough for 2-3 weeks of daily use.
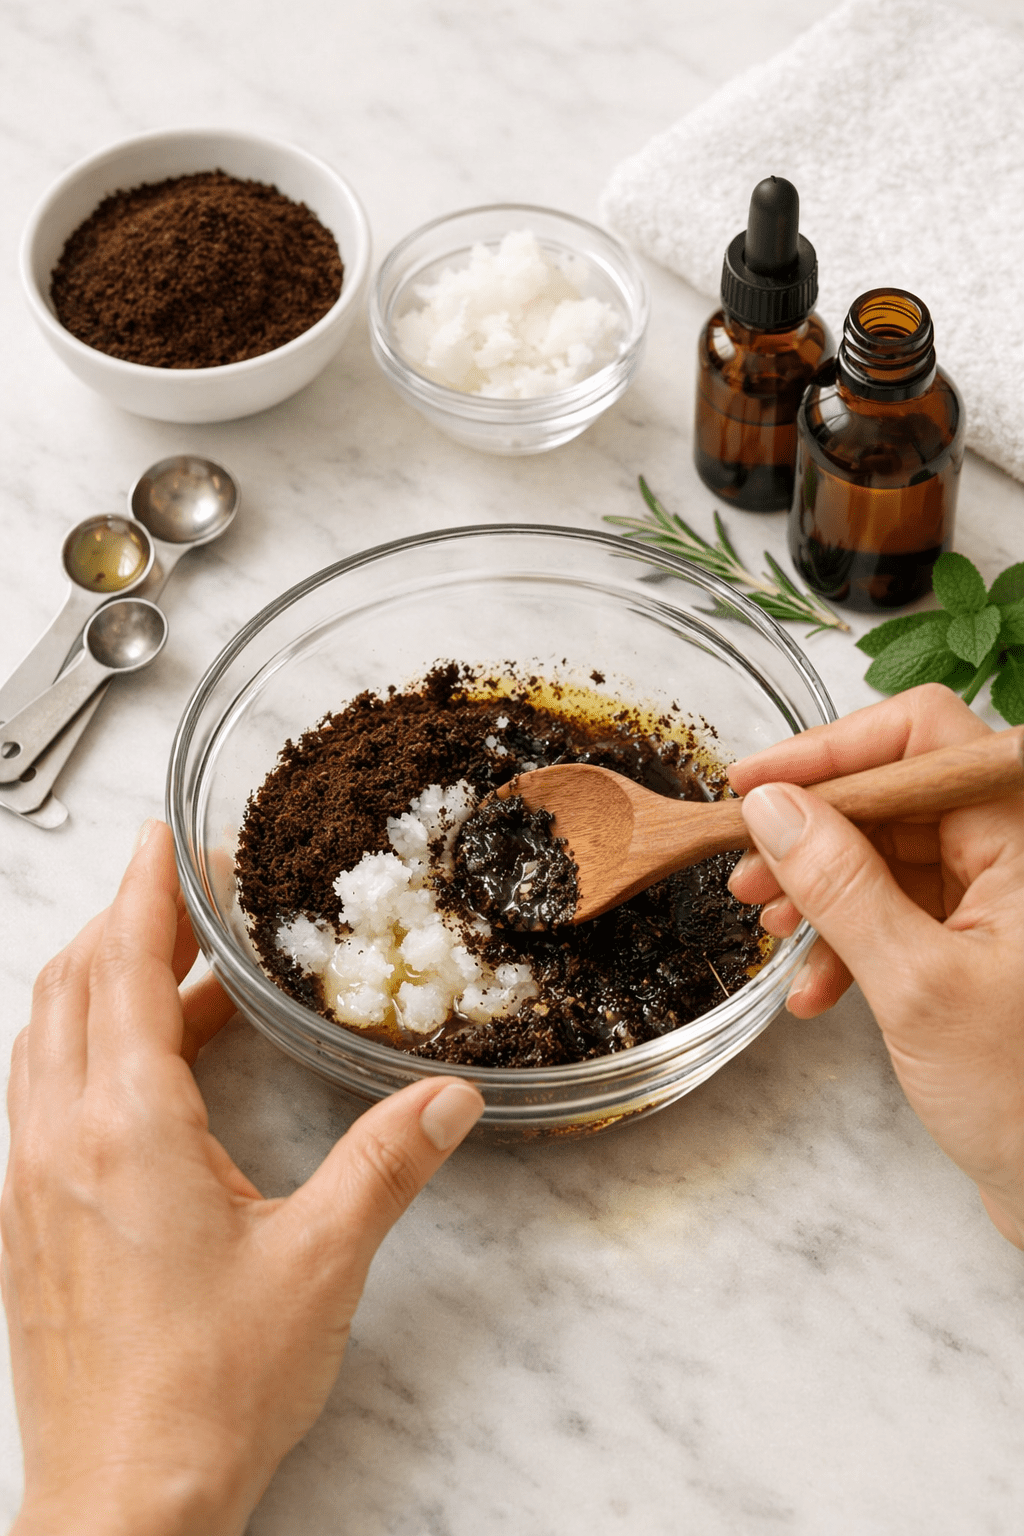
Basic Coffee and Coconut Oil Recipe
Ingredients:
- 1/2 cup coconut oil (softened, not melted)
- 1/4 cup finely ground coffee
- 2 tablespoons sweet almond oil
- 10 drops grapefruit essential oil
- 5 drops juniper berry essential oil
- 2 vitamin E capsules (optional)
Step-by-step instructions:
- Soften the coconut oil by leaving it at room temperature for 30 minutes (it should be soft but not liquid)
- Mix the base: In a medium bowl, combine coconut oil and sweet almond oil with a spoon or hand mixer until smooth
- Add coffee grounds: Stir in finely ground coffee until evenly distributed throughout the mixture
- Incorporate essential oils: Add grapefruit and juniper berry oils, mixing thoroughly
- Add vitamin E: Pierce vitamin E capsules and squeeze the oil into the mixture (this helps preserve the cream)
- Whip the mixture: Use a hand mixer or vigorous stirring for 2-3 minutes until the texture becomes fluffy and light
- Transfer to container: Spoon the cream into a clean, dry glass jar with a tight-fitting lid
- Label and date: Write the creation date on the jar so you know when to discard it
Storage: Keep in the refrigerator for up to 2 weeks. The cream will solidify when cold but will soften when it touches warm skin.
Common mistake: Using coffee grounds that are too coarse, which can scratch or irritate skin. If you only have coarse grounds, pulse them in a coffee grinder for a few seconds to create a finer texture.
If you enjoy making natural body care products, you might also like our DIY warming muscle rub recipe.
How Should I Apply DIY Anticellulite Cream for Best Results?
The application technique matters just as much as the cream itself when trying to improve the appearance of cellulite. Proper massage increases circulation and may help reduce fluid retention, which can make skin look smoother temporarily.
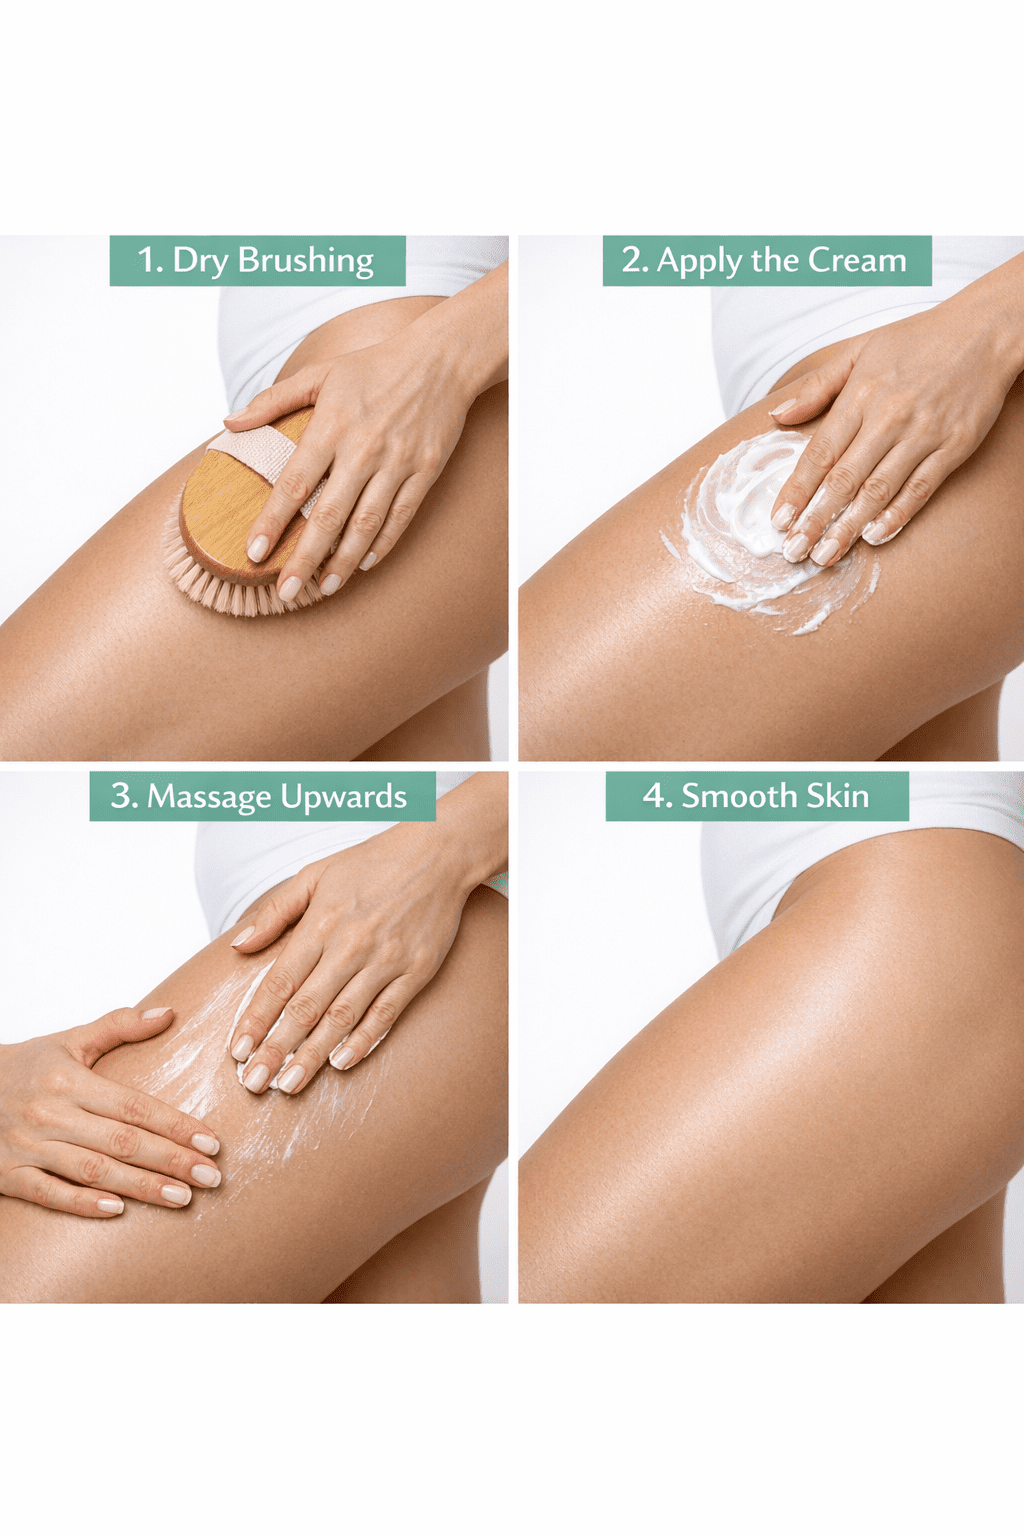
Application Technique
Before applying:
- Dry brush the area for 2-3 minutes using circular motions toward your heart
- Take a warm shower to open pores and soften skin
- Pat skin dry but leave slightly damp for better absorption
Application steps:
- Scoop a tablespoon of cream and warm it between your palms
- Apply in circular motions starting from your ankles and moving upward
- Use firm pressure but not so hard that it causes pain or bruising
- Massage for 5-10 minutes per area, focusing on spots where cellulite is most visible
- Use upward strokes to encourage lymphatic drainage
- Knead the skin gently between your fingers and thumbs
- Finish with long, sweeping motions toward your heart
Frequency and Timing
- Daily application shows better results than sporadic use
- Morning or evening both work, but evening allows the cream to absorb overnight
- After exercise is ideal because circulation is already increased
- Consistency matters more than amount used
Decision rule: If you have only 5 minutes, focus on thorough massage of one area rather than rushing through multiple areas. The massage technique provides more benefit than simply slathering on cream.
What to expect: You might notice skin feels smoother and looks more hydrated immediately after application. Any visible improvement in cellulite appearance typically takes 4-6 weeks of consistent daily use, and results remain modest.
What Are the Pros and Cons of DIY Anticellulite Cream?
Before investing time in making your own anticellulite cream, it helps to understand both the benefits and limitations compared to commercial products or professional treatments.
Pros
Cost-effective
- Homemade versions cost $5-10 per batch versus $30-60 for commercial creams
- Ingredients can be used for multiple batches and other DIY projects
Control over ingredients
- You know exactly what’s going on your skin
- Can avoid synthetic fragrances, preservatives, and allergens
- Easy to customize for your skin type and preferences
Therapeutic ritual
- The process of making and applying the cream provides self-care time
- Massage technique offers relaxation benefits beyond potential cellulite improvement
- Can be a mindful practice that helps you appreciate your body
Fresh formulation
- No preservatives needed for short-term use
- Ingredients are at peak potency when freshly mixed
Cons
Limited scientific evidence
- Very little research supports the effectiveness of common DIY ingredients like coffee and coconut oil for cellulite
- Results, if any, are temporary and modest
- The massage technique may provide more benefit than the ingredients themselves
Short shelf life
- Must be refrigerated and used within 1-2 weeks
- Risk of bacterial growth if water-based ingredients are added
- Requires frequent remaking
Inconsistent results
- Effectiveness varies significantly between individuals
- Difficult to measure or predict outcomes
- May see no visible change despite consistent use
Time investment
- Making cream takes 10-15 minutes every 1-2 weeks
- Daily application and massage adds 10-15 minutes to your routine
- Results require weeks of consistent effort
Potential for skin irritation
- Essential oils can cause reactions in sensitive individuals
- Coffee grounds may be too abrasive for some skin types
- Coconut oil can clog pores in acne-prone individuals
Choose DIY creams if: You want an affordable, natural option, enjoy making your own products, and have realistic expectations about modest, temporary results.
Skip DIY creams if: You want scientifically proven results, don’t have time for daily application, or prefer the convenience and longer shelf life of commercial products.
For more beginner-friendly natural remedies, see our getting started guide.
How Can I Customize My DIY Anticellulite Cream Recipe?
Once you’ve mastered the basic recipe, you can adjust ingredients to match your skin type, preferences, and specific concerns. Customization lets you create a formula that works best for your individual needs.
For Different Skin Types
Dry skin:
- Increase shea butter to 2 tablespoons
- Add 1 tablespoon cocoa butter for extra moisture
- Use avocado oil instead of almond oil
Oily or acne-prone skin:
- Replace coconut oil with jojoba oil or grapeseed oil
- Reduce overall oil content by 25%
- Add 1 tablespoon witch hazel (note: this reduces shelf life to 1 week)
Sensitive skin:
- Omit essential oils or reduce to 3-5 drops total
- Use chamomile-infused oil as your carrier oil
- Skip coffee grounds and use matcha powder instead for gentler exfoliation
Texture Variations
Thicker cream:
- Add 1-2 tablespoons beeswax (melt with oils, then cool and whip)
- Increase shea butter content
- Reduce liquid oil amounts
Lighter lotion:
- Increase liquid oils (almond, jojoba) by 2 tablespoons
- Reduce solid fats (coconut oil, shea butter)
- Add 1 tablespoon aloe vera gel (reduces shelf life)
Scrub-style cream:
- Double the coffee grounds to 1/2 cup
- Add 2 tablespoons brown sugar for extra exfoliation
- Use only once or twice weekly to avoid over-exfoliating
Scent Customization
Replace or combine essential oils based on preference:
- Citrus blend: Grapefruit, lemon, and sweet orange (10 drops total)
- Herbal blend: Rosemary, sage, and lavender (10 drops total)
- Spicy blend: Cinnamon (2 drops), ginger (3 drops), black pepper (2 drops)
Important: Never exceed 1-2% essential oil concentration (about 10-12 drops per 1/2 cup of base). Higher concentrations increase irritation risk.
Boosting Ingredients
For extra firming effect:
- Add 1 teaspoon seaweed powder
- Include 2 tablespoons green tea (cooled, but this reduces shelf life)
- Mix in 1 tablespoon bentonite clay
For enhanced absorption:
- Add 1 teaspoon dimethicone (optional, not fully natural)
- Include 1 capsule of CoQ10
- Mix in 1/2 teaspoon niacinamide powder
Common mistake: Adding too many ingredients at once makes it difficult to identify what works or causes irritation. Change one variable at a time and test for a week before adding more modifications.
What Other Natural Methods Complement DIY Anticellulite Cream?
DIY anticellulite cream works best as part of a broader approach to skin health and appearance. Combining topical treatments with other natural methods may enhance results, though remember that cellulite is normal and doesn’t require “fixing.”
Dry Brushing
- Brush skin in circular motions before showering
- Always brush toward your heart to support lymphatic drainage
- Use a natural bristle brush with firm but not scratchy bristles
- Spend 2-3 minutes on areas with cellulite
- May temporarily improve skin texture and circulation
Hydration and Diet
- Drink 8-10 glasses of water daily to keep skin plump and hydrated
- Reduce sodium intake to minimize fluid retention
- Eat foods rich in antioxidants (berries, leafy greens, nuts)
- Include collagen-supporting foods (bone broth, citrus fruits, bell peppers)
Exercise and Movement
- Strength training builds muscle that may make skin appear smoother
- Cardiovascular exercise improves circulation
- Yoga and stretching enhance flexibility and body awareness
- Even walking 30 minutes daily can help
Other Topical Treatments
- Retinol creams: May improve skin thickness over several months (requires consistent use)
- Exfoliation: Regular gentle exfoliation removes dead skin cells and may improve product absorption
- Moisturization: Well-hydrated skin looks plumper and smoother
Professional Options
If you want more dramatic results than DIY methods can provide:
- Laser treatments: Can reduce cellulite appearance for several months
- Radiofrequency therapy: May tighten skin temporarily
- Acoustic wave therapy: Shows promise in clinical studies
- Subcision: A minor surgical procedure that releases fibrous bands
Realistic expectation: Even professional treatments provide temporary improvement rather than permanent elimination. Cellulite often returns gradually over 6-12 months.
For more natural body care recipes, explore our calendula recipes for skin care.
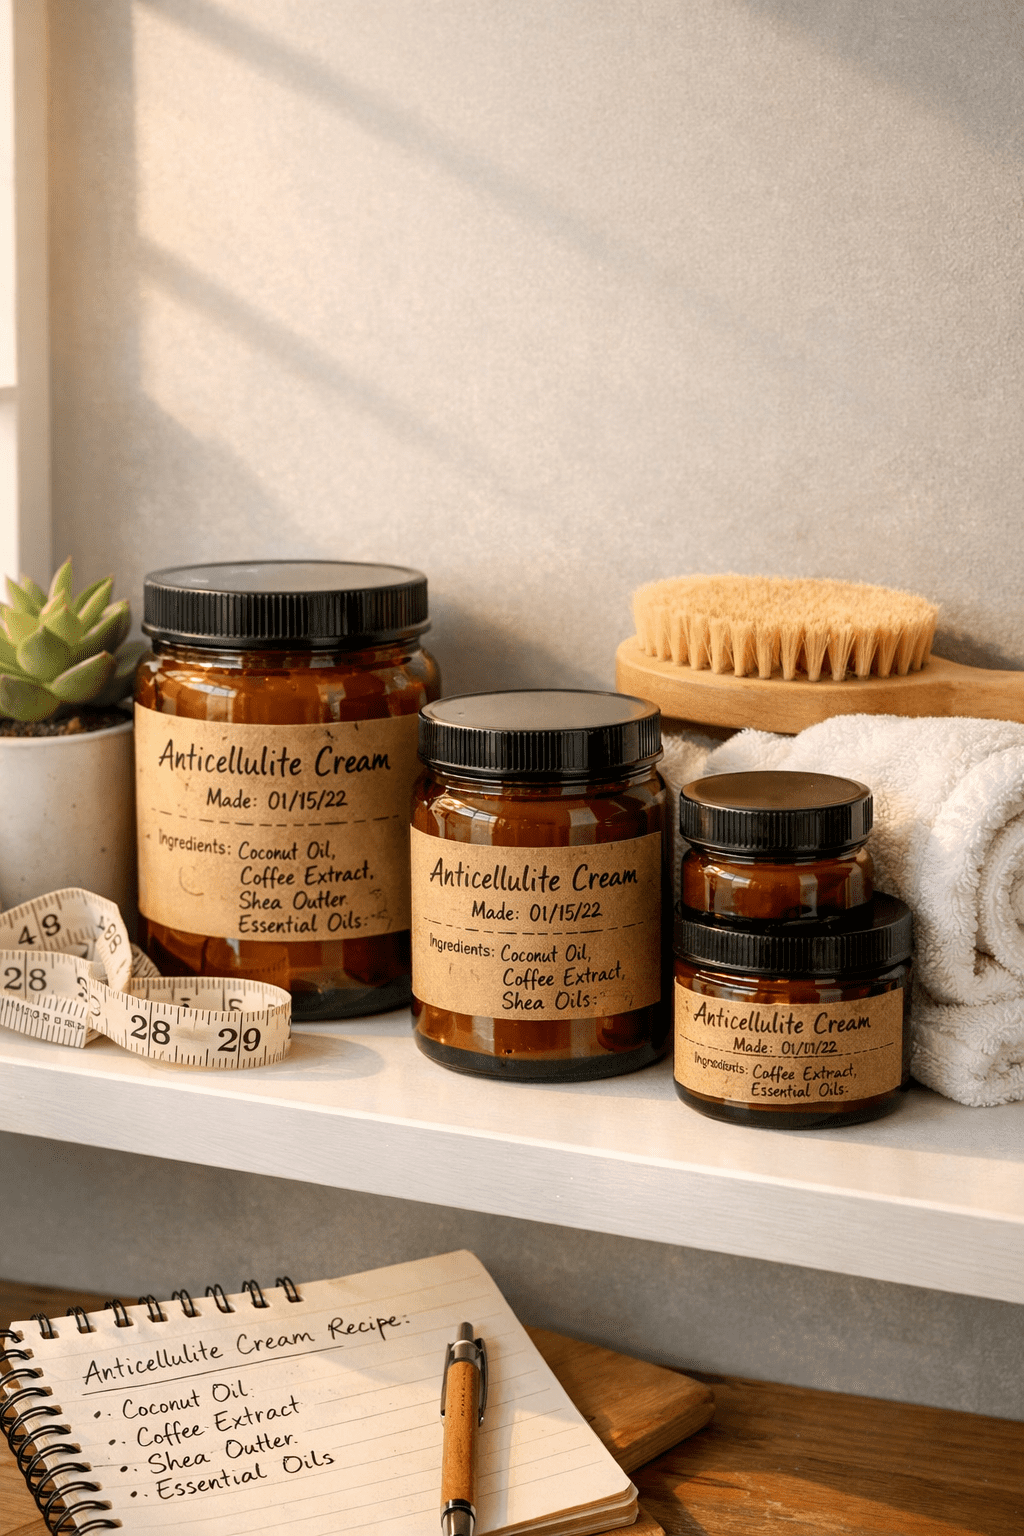
How Do I Store and Preserve DIY Anticellulite Cream Safely?
Proper storage is crucial for homemade skincare products because they lack the preservatives found in commercial formulations. Improper storage can lead to bacterial growth, rancidity, or reduced effectiveness.
Storage Guidelines
Container selection:
- Use glass jars rather than plastic (glass doesn’t absorb oils or odors)
- Choose amber or cobalt blue glass to protect from light
- Ensure lids seal tightly to prevent air exposure
- Sterilize containers before use by boiling for 10 minutes or running through dishwasher
Temperature and location:
- Store in refrigerator at 35-40°F for maximum shelf life
- Keep away from direct sunlight and heat sources
- Don’t store in bathroom if it gets steamy (moisture encourages bacterial growth)
- Let cream come to room temperature before use, or warm small amount in hands
Shelf life by recipe type:
- Oil-only formulations: 2-3 weeks refrigerated
- Recipes with vitamin E: Up to 3 weeks
- Formulations with water-based ingredients (aloe, witch hazel): 1 week maximum
- Recipes with fresh ingredients (cucumber, fruit): 3-5 days only
Signs Your Cream Has Gone Bad
Discard immediately if you notice:
- Change in smell (rancid, sour, or off odor)
- Visible mold or discoloration
- Separation that doesn’t remix when stirred
- Change in texture (becomes grainy, watery, or slimy)
- Skin irritation after use when it didn’t irritate before
Extending Shelf Life
Natural preservatives to consider:
- Vitamin E oil: Extends oil shelf life by preventing oxidation
- Rosemary oleoresin extract: Natural antioxidant preservative
- Grapefruit seed extract: Antimicrobial properties (though effectiveness is debated)
Best practices:
- Use a clean spoon or spatula to scoop cream (never fingers)
- Keep lid closed when not in use
- Make smaller batches more frequently
- Label jars with creation date
- Write ingredient list on jar in case of skin reaction
Common mistake: Making large batches to save time, then having to throw away half because it spoiled. It’s better to make fresh small batches every 1-2 weeks.
FAQ
Does DIY anticellulite cream actually work?
DIY anticellulite cream may temporarily improve skin texture and hydration but won’t eliminate cellulite. The massage technique used during application likely provides more benefit than the ingredients themselves. Scientific evidence for common DIY ingredients like coffee and coconut oil is very limited.
How long does it take to see results from homemade anticellulite cream?
If you notice any improvement, it typically appears after 4-6 weeks of daily use. Results are modest and temporary, usually limited to slightly smoother skin texture and better hydration rather than visible cellulite reduction.
Can I use regular coffee or does it need to be fresh grounds?
Fresh, unused coffee grounds work better than used grounds because they contain more caffeine and oils. Finely ground coffee is gentler on skin than coarse grounds. Regular coffee works fine; you don’t need expensive specialty coffee.
Is coconut oil the best carrier oil for anticellulite cream?
Coconut oil is popular but not necessarily the best for everyone. It can clog pores in acne-prone individuals. Sweet almond oil, jojoba oil, or grapeseed oil are lighter alternatives that absorb more quickly and work better for oily or combination skin types.
How often should I apply DIY anticellulite cream?
Daily application provides better results than occasional use. Once daily is sufficient, though you can apply twice daily if desired. Consistency matters more than frequency, so daily application for several weeks beats sporadic intensive use.
Can I add water to make the cream lighter?
Adding water creates a lotion texture but dramatically reduces shelf life to just 3-5 days unless you add a proper preservative system. Water-based formulations also require an emulsifier to prevent separation. For beginners, stick with oil-only recipes.
Will dry brushing enhance the effects of anticellulite cream?
Dry brushing before applying cream may enhance results by increasing circulation and exfoliating dead skin cells, which can improve product absorption. Brush for 2-3 minutes before showering, then apply cream to clean, slightly damp skin.
Are essential oils necessary in DIY anticellulite cream?
Essential oils are optional. They add fragrance and may provide minor circulation benefits, but the base ingredients (coffee and carrier oils) are the primary active components. Skip essential oils if you have sensitive skin or prefer unscented products.
Can men use DIY anticellulite cream?
Yes, though men experience cellulite less frequently than women due to differences in how fat and connective tissue are structured. The cream works the same way regardless of gender and can improve skin texture and hydration for anyone.
How much does it cost to make DIY anticellulite cream?
A basic batch costs approximately $5-10 and makes enough cream for 2-3 weeks of daily use. This is significantly cheaper than commercial anticellulite creams, which typically cost $30-60 for similar amounts.
Can I use DIY anticellulite cream during pregnancy?
Consult your healthcare provider before using any new skincare products during pregnancy. Some essential oils aren’t recommended during pregnancy. A simple version with just coffee grounds and carrier oil is generally considered safe, but always check with your doctor first.
What’s the difference between DIY cream and expensive commercial products?
Commercial anticellulite creams may contain higher concentrations of active ingredients like retinol or caffeine and include preservatives for longer shelf life. Some clinical studies show modest improvements with certain commercial formulations, but the difference between DIY and commercial products is generally small, and neither provides dramatic results.
Conclusion
Making your own DIY anticellulite cream is an affordable, natural way to care for your skin and practice self-care, even though it won’t eliminate cellulite permanently. The combination of moisturizing ingredients and massage technique can temporarily improve skin texture and hydration, making skin feel smoother and look more radiant.
Remember that cellulite is completely normal and affects most women regardless of size, fitness level, or health status. There’s no need to “fix” something that’s a natural part of having a body. If you choose to make and use anticellulite cream, do it because you enjoy the ritual and like how your skin feels afterward, not because you think cellulite is a problem that needs solving.
Your next steps:
- Gather your ingredients and make a small test batch of the basic recipe
- Patch test on your inner arm for 24 hours before full application
- Establish a daily routine that includes dry brushing and cream application
- Track your results with photos if you want to monitor any changes
- Adjust the recipe based on your skin type and preferences after a week of use
- Explore other natural skincare recipes to expand your DIY routine
The most important ingredient in any skincare routine is consistency and self-compassion. Whether your skin changes or stays the same, the time you spend caring for yourself has value beyond any visible results.