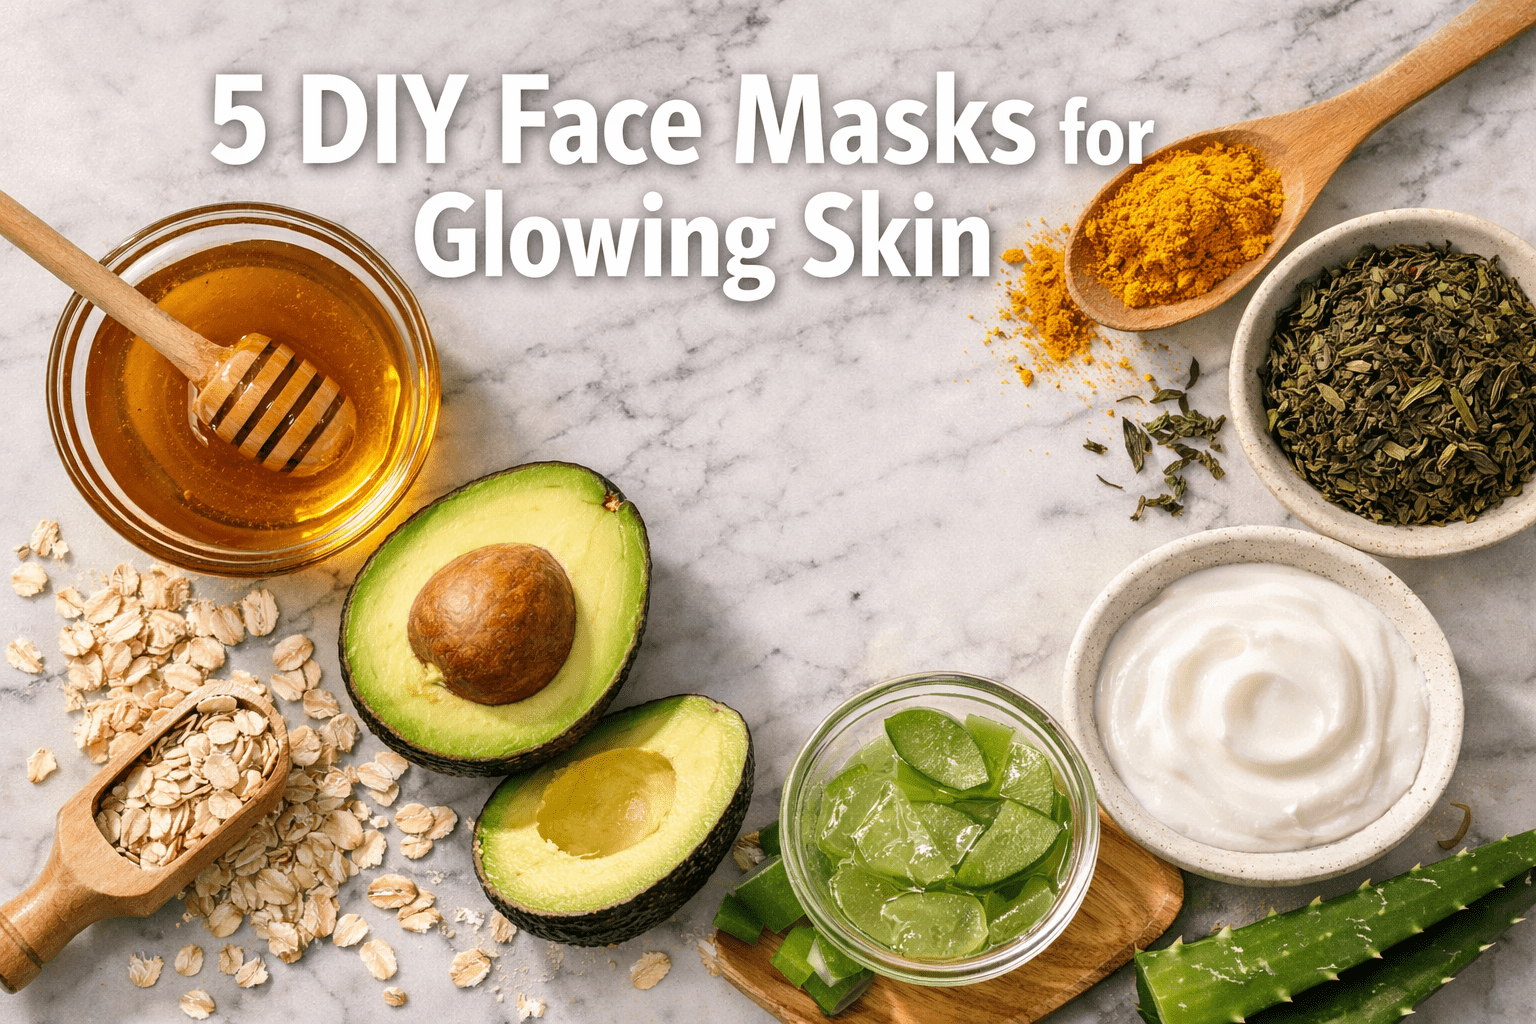
Creating your own face masks at home gives you complete control over what touches your skin. These 5 DIY face masks for glowing skin address specific concerns—from redness and dryness to breakouts and sensitivity—using ingredients you likely already have in your kitchen. Each mask targets a different skin need, so you can choose the formula that matches your current concern.
This content is for informational purposes only and is not medical advice. Always consult a healthcare professional before trying any remedy.
Key Takeaways
- Turmeric yogurt mask brightens uneven skin tone and calms redness in 15 minutes
- Avocado oat mask repairs dry, flaky skin by restoring the skin’s natural lipid barrier
- Green tea aloe mask detoxifies combination and acne-prone skin with antioxidant polyphenols
- Honey oat mask soothes sensitive, reactive skin without triggering irritation
- Bentonite clay mask clarifies oily skin and unclogs pores in 8-10 minutes
- Natural ingredients work in harmony with your skin’s barrier rather than stripping it
- Most masks require 10-20 minutes of application time for visible results
Quick Answer
The 5 DIY face masks for glowing skin each address a specific concern: turmeric yogurt for brightening and calming redness, avocado oat for nourishing dry skin, green tea aloe for detoxifying combination skin, honey oat for soothing sensitivity, and bentonite clay for clarifying oily, congested skin. These botanical blends combine vitamins, antioxidants, and gentle exfoliants that work with your skin’s natural barrier rather than against it[1].
What Makes These 5 DIY Face Masks for Glowing Skin Different?
Each of these five masks targets a distinct skin concern using ingredients with documented benefits. Natural face masks support long-term skin health by working with your skin’s barrier instead of stripping natural oils or triggering irritation[1].
The key difference lies in ingredient synergy—combining specific vitamins, antioxidants, and gentle exfoliants that complement each other. For example, honey and oats demonstrate significant anti-inflammatory and antioxidant properties that improve skin health by reducing oxidative stress and inflammation[2].
Choose your mask based on your current skin state:
- Experiencing post-acne marks or visible redness? Start with turmeric yogurt
- Dealing with flaky, compromised skin? Use avocado oat
- Fighting breakouts on combination skin? Try green tea aloe
- Managing reactive, itchy skin? Apply honey oat
- Struggling with congestion and blackheads? Reach for bentonite clay
Common mistake: Using the same mask regardless of your skin’s changing needs. Your skin’s requirements shift with seasons, stress levels, and hormones—rotate these masks accordingly.
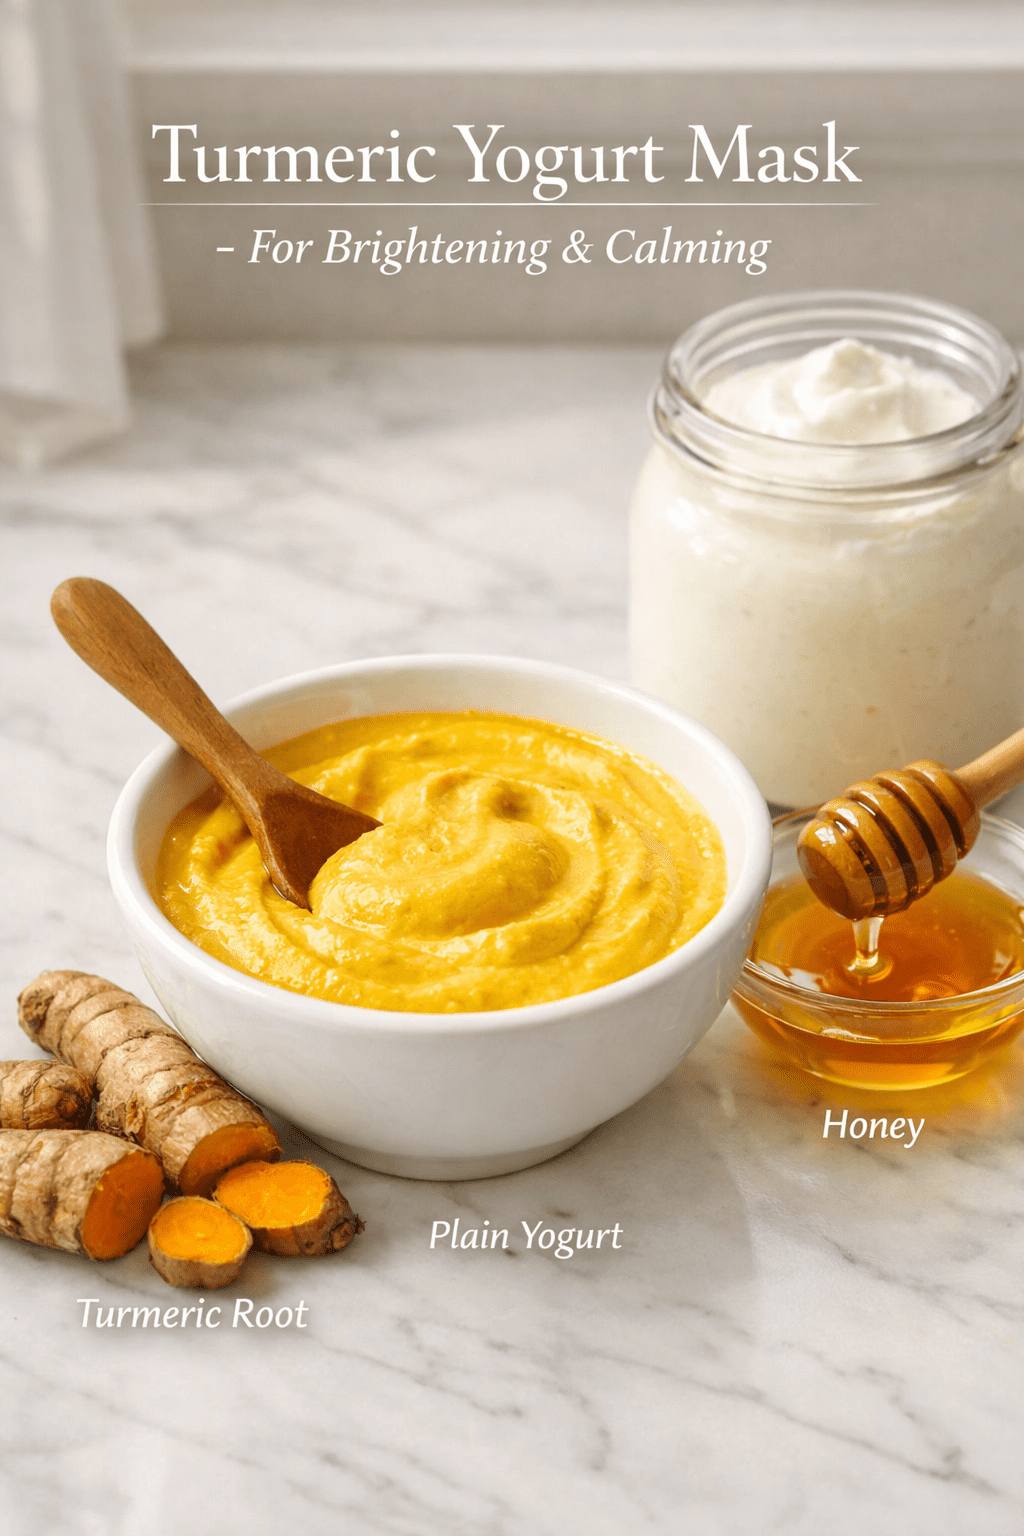
Turmeric Yogurt Mask: For Brightening Uneven Tone and Calming Redness
This three-ingredient mask combines turmeric’s antioxidant and anti-inflammatory properties with yogurt’s lactic acid for gentle exfoliation[2]. It specifically targets post-acne marks and visible redness with a 15-minute application time.
Ingredients:
- 1 tablespoon plain yogurt (full-fat works best)
- 1/2 teaspoon turmeric powder
- 1 teaspoon honey
Application steps:
- Mix ingredients in a non-metal bowl until smooth
- Apply to clean, dry skin avoiding the eye area
- Leave on for 15 minutes
- Rinse with lukewarm water using gentle circular motions
- Follow with your regular moisturizer
Important note: Turmeric can temporarily stain fair skin yellow. Test on your jawline first, and reduce turmeric to 1/4 teaspoon if staining occurs. The yellow tint typically fades within an hour.
Best for: Those with uneven skin tone from sun damage, post-inflammatory hyperpigmentation, or persistent redness from rosacea or irritation.
Avocado Oat Mask: Deep Nourishment for Dry, Stressed Skin
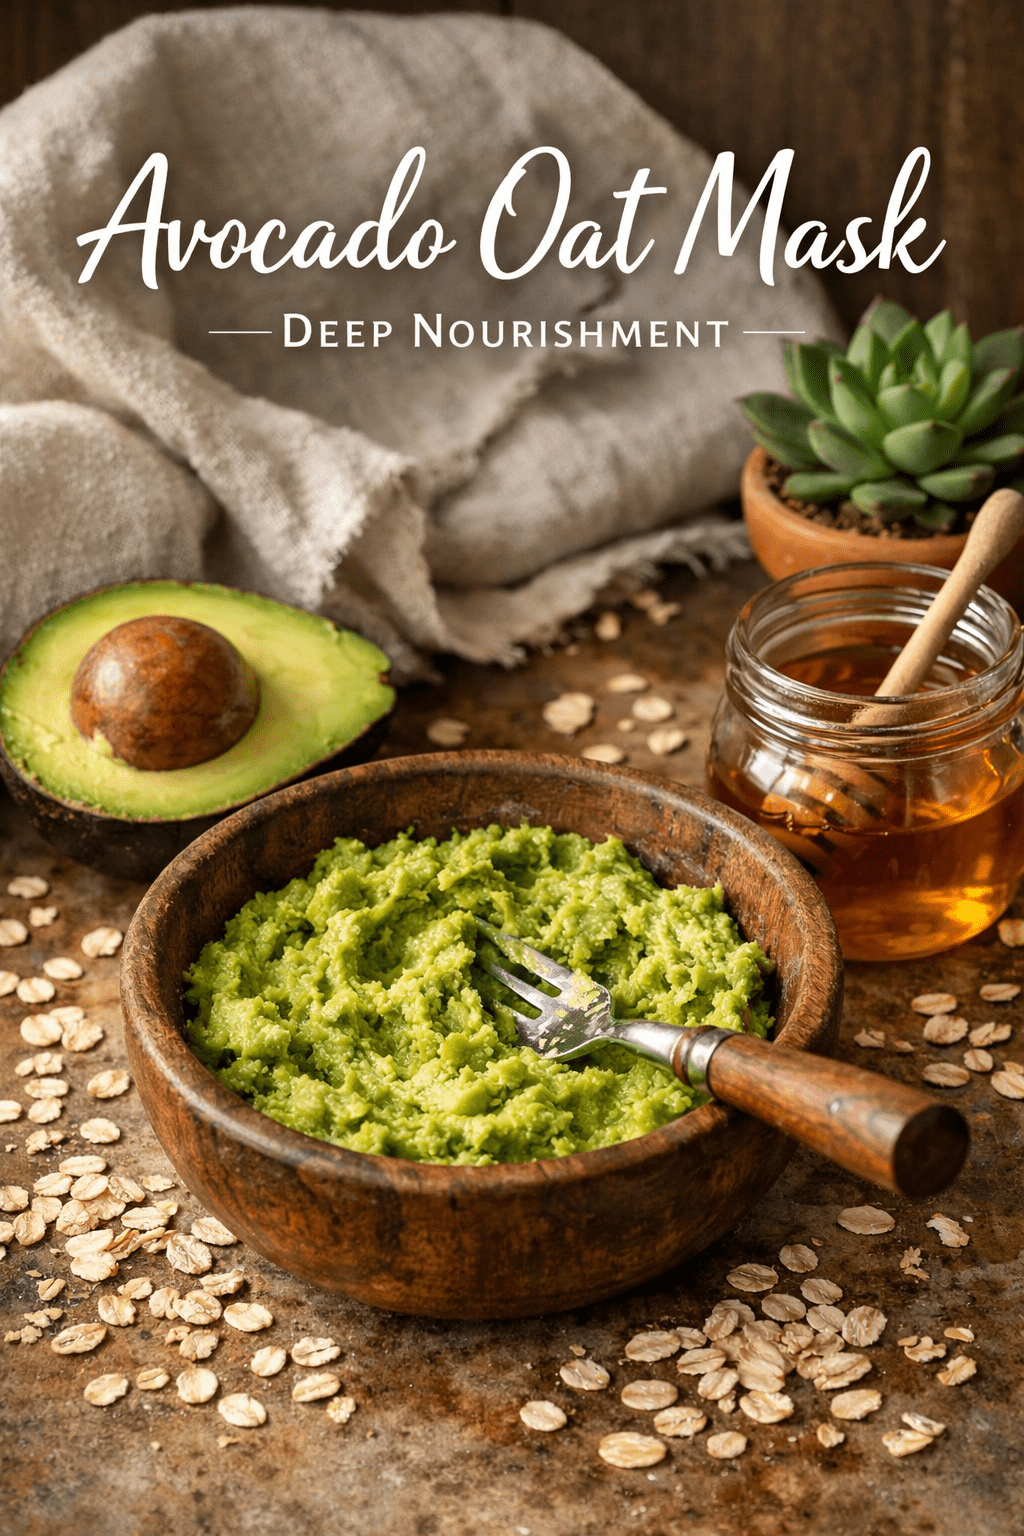
Avocado contains omega-3 fatty acids and B vitamins that restore the skin’s lipid layer[3]. This mask requires 15-20 minutes and specifically targets flaky or compromised skin barriers[2].
Ingredients:
- 1/2 ripe avocado, mashed
- 2 tablespoons finely ground oats
- 1 teaspoon honey
- 1 teaspoon plain yogurt (optional, for extra creaminess)
Why this works: The healthy fats in avocado penetrate the skin’s outer layer, while oats provide gentle buffing action and anti-inflammatory benefits. ELLE editors who tested pantry-based DIY masks reported skin felt “baby soft” and “radiant” after similar formulations[3].
Application guidelines:
- Apply a thick layer to clean skin
- Let sit for 15-20 minutes (can extend to 25 minutes for very dry skin)
- Remove with a warm, damp washcloth using gentle pressure
- Pat dry and apply a rich moisturizer while skin is still slightly damp
Choose this mask if: Your skin feels tight after cleansing, shows visible flaking, or appears dull from dehydration. It’s particularly effective during winter months or after travel.
Edge case: If you have oily skin but experience dry patches, apply this mask only to the dry areas and use the bentonite clay mask on your T-zone.
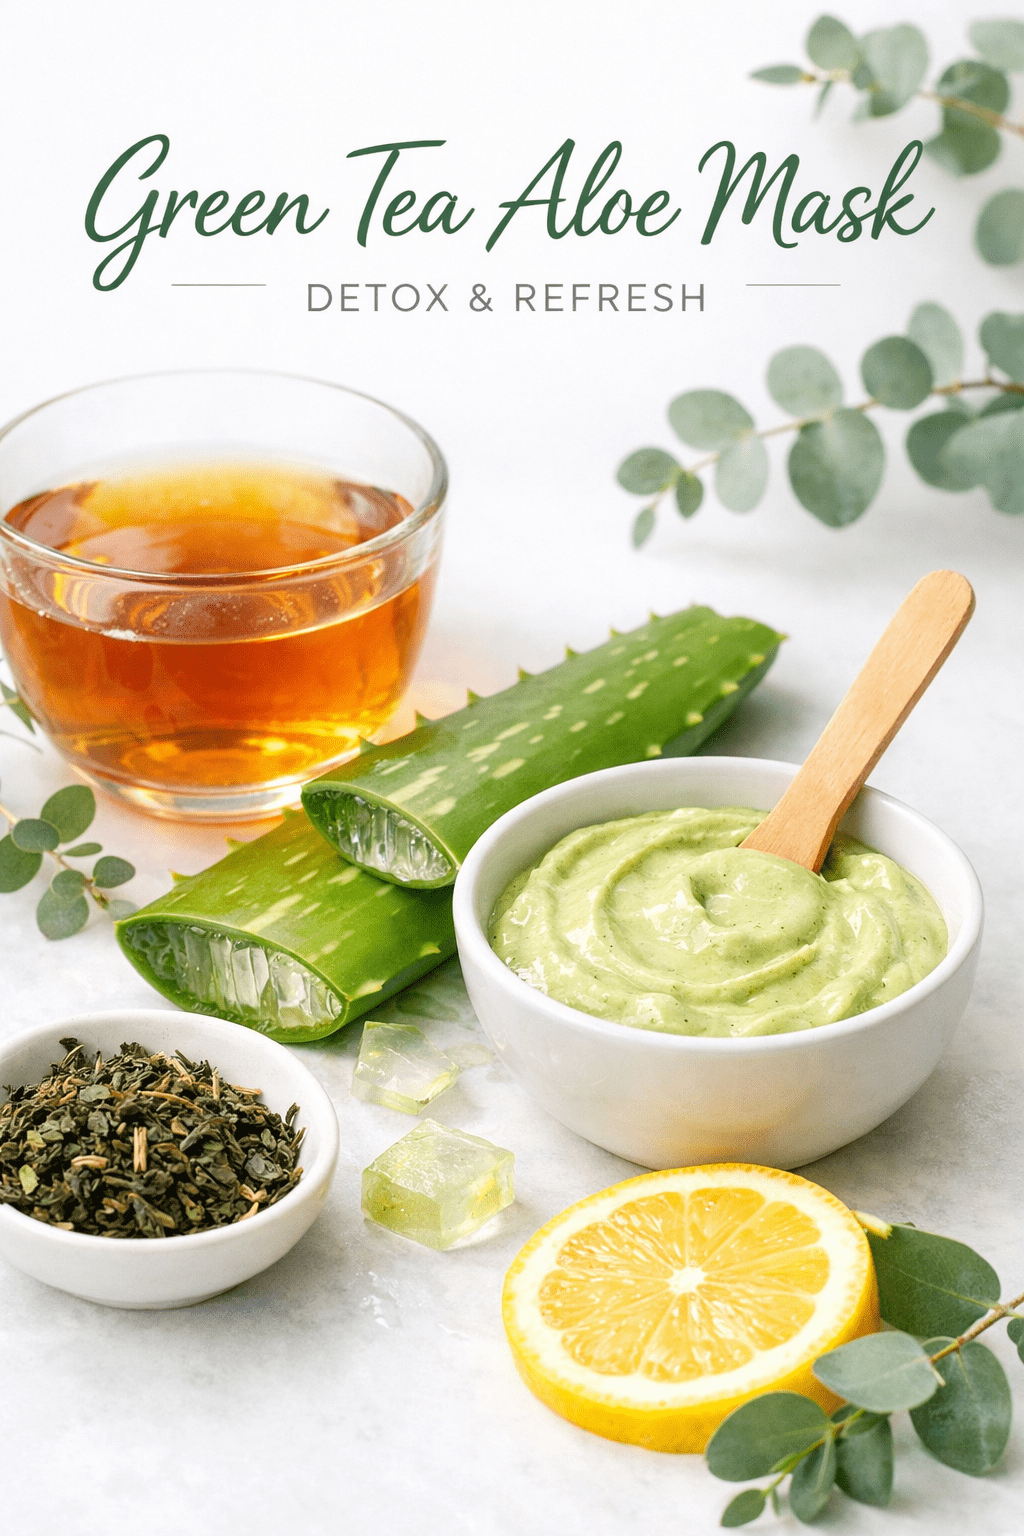
Green Tea Aloe Mask: Detoxifying Combination and Acne-Prone Skin
This mask features polyphenols that fight oxidative stress with a 10-15 minute application time[2]. It requires caution around the eye area due to optional lemon content.
Ingredients:
- 2 tablespoons brewed green tea (cooled)
- 2 tablespoons fresh aloe vera gel
- 1 tablespoon honey
- 1/2 teaspoon fresh lemon juice (optional, for extra brightening)
Preparation method:
- Brew green tea and let it cool completely
- Mix all ingredients in a glass bowl
- Apply to clean skin, avoiding the delicate eye area
- Leave on for 10-15 minutes
- Rinse thoroughly with cool water
Why green tea works: The antioxidant polyphenols in green tea reduce inflammation and protect against environmental damage. Combined with aloe’s soothing properties, this mask calms active breakouts while preventing new ones[2].
Common mistake: Leaving the mask on too long. The lemon juice can become irritating after 15 minutes, especially on sensitive areas. Set a timer to avoid over-exposure.
Best results: Use this mask 2-3 times per week if you’re managing active breakouts, or once weekly for maintenance. For more information on natural skincare approaches, visit The Herbal Handbook.
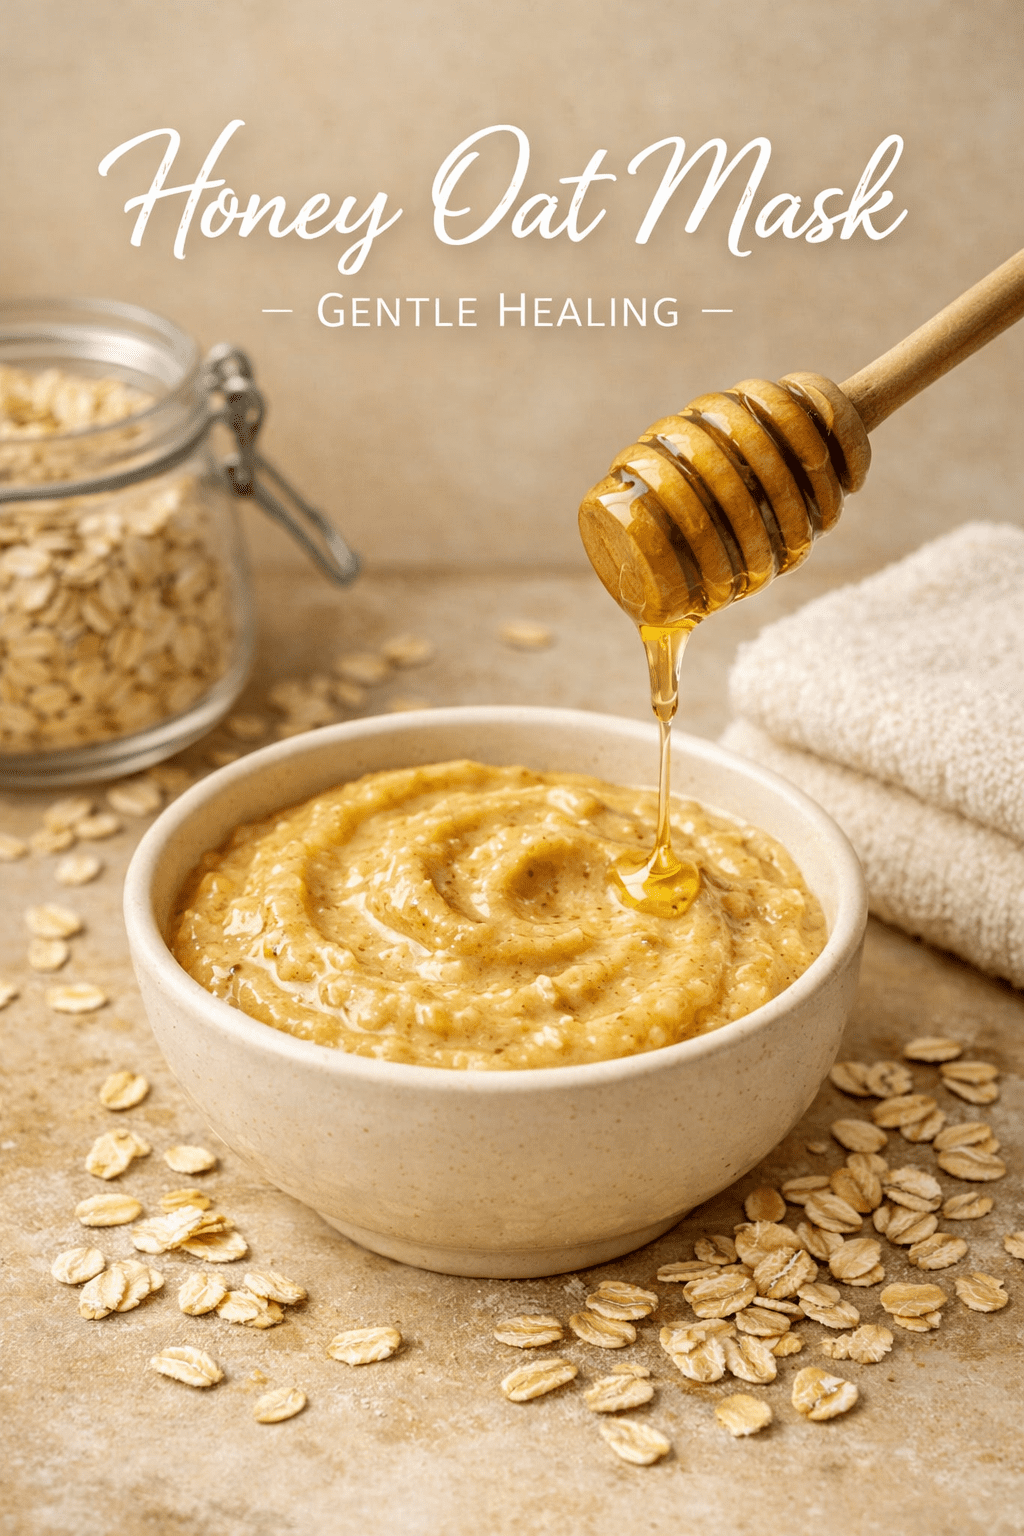
Honey Oat Mask: Gentle Healing for Sensitive, Reactive Skin
Oats reduce itching and inflammation while honey acts as a humectant, pulling moisture deep into skin[2]. This mask requires a 20-minute application with soft cloth removal.
Ingredients:
- 3 tablespoons finely ground oats (grind rolled oats in a blender)
- 2 tablespoons raw honey
- 1 tablespoon warm water or milk
Why this is the gentlest option: Both honey and oats have been used for centuries to calm irritated skin. Honey’s natural antibacterial properties protect compromised skin barriers, while oats contain compounds called avenanthramides that reduce inflammation and itching.
Step-by-step application:
- Grind oats into a fine powder (coarse pieces can irritate)
- Mix with honey and warm liquid until you achieve a spreadable paste
- Apply generously to clean skin
- Let sit for 20 minutes while relaxing
- Remove with a soft, damp cloth using gentle patting motions
- Rinse with lukewarm water
Perfect for: Skin that reacts to most products, experiences frequent redness or burning, or has conditions like eczema or rosacea. This mask rarely triggers reactions.
Decision rule: If you’re unsure whether your skin will tolerate a new mask, start with this one. It’s the safest option for testing your skin’s response to DIY treatments.
Bentonite Clay Mask: Clarifying Oily, Congested Skin
Bentonite clay combined with apple cider vinegar addresses congestion, blackheads, and oiliness with an 8-10 minute application[2]. The critical note: avoid over-drying by monitoring your time carefully.
Ingredients:
- 1 tablespoon bentonite clay
- 1-2 teaspoons raw apple cider vinegar
- 1 teaspoon water (if mixture is too thick)
Important mixing instructions:
- Use a non-metal bowl and spoon (metal can reduce clay’s effectiveness)
- Mix until you achieve a smooth, spreadable consistency
- The mixture should look like thick pancake batter
Application protocol:
- Apply to clean, dry skin focusing on oily areas (T-zone, chin)
- Leave on for 8-10 minutes maximum—do not let it completely dry and crack
- Spritz with water if it starts to feel too tight
- Remove with warm water and a soft washcloth
- Apply a lightweight, oil-free moisturizer immediately
Why timing matters: Clay masks draw out impurities and excess oil, but leaving them on too long can strip your skin and trigger increased oil production. When the mask is about 80% dry, it’s time to remove it[2].
Use this mask if: You have visibly enlarged pores, frequent blackheads, or skin that looks shiny by midday. Limit use to 1-2 times per week to prevent over-drying.
Troubleshooting: If your skin feels tight or looks red after removal, you’ve left it on too long. Next time, remove it sooner and apply a more generous layer of moisturizer afterward.
How to Choose the Right Mask from These 5 DIY Face Masks for Glowing Skin
Your current skin concern—not your skin type—should guide your choice. Skin needs change based on weather, stress, hormones, and lifestyle factors.
Quick decision matrix:
| Current Concern | Best Mask | Frequency |
|---|---|---|
| Dark spots, uneven tone | Turmeric Yogurt | 2-3x per week |
| Dryness, flaking | Avocado Oat | 2x per week |
| Active breakouts | Green Tea Aloe | 2-3x per week |
| Redness, sensitivity | Honey Oat | 2-3x per week |
| Oily T-zone, blackheads | Bentonite Clay | 1-2x per week |
Can you use multiple masks? Yes. Multi-masking—applying different masks to different areas of your face—works well for combination skin. Apply clay to your T-zone and honey oat to your cheeks simultaneously.
Seasonal adjustments:
- Winter: Focus on avocado oat and honey oat masks
- Summer: Rotate between green tea aloe and bentonite clay
- Spring/Fall: Use turmeric yogurt for post-summer sun damage or pre-winter brightening
Common mistake: Expecting instant transformation. Natural masks work gradually by supporting your skin’s natural processes. Most people notice visible improvements after 3-4 consistent applications.
For additional guidance on natural skincare, check out our about page to learn more about herbal approaches to skin health.
Essential Tips for Making and Using DIY Face Masks
Following proper preparation and application techniques ensures you get the best results from these 5 DIY face masks for glowing skin.
Preparation best practices:
- Always patch test: Apply a small amount to your inner forearm 24 hours before full-face application
- Use fresh ingredients: Make masks immediately before use; most don’t store well
- Proper mixing tools: Glass or ceramic bowls work best; avoid metal with clay-based masks
- Ingredient quality: Choose organic when possible, especially for ingredients that penetrate skin
Application techniques:
- Start with clean skin: Remove makeup and cleanse thoroughly
- Apply to damp skin: Slightly damp skin helps masks spread more easily
- Use clean hands or brush: A clean foundation brush provides even application
- Avoid sensitive areas: Keep masks away from eyes, lips, and any broken skin
- Relax during treatment: Lie down to prevent masks from sliding off
Removal methods:
- Use lukewarm water (never hot, which can irritate)
- Employ a soft washcloth or muslin cloth for gentle removal
- Remove in circular motions to get gentle exfoliation benefits
- Rinse thoroughly—residue can cause irritation
Post-mask care:
- Apply toner to balance pH if you use one
- Follow with serum while skin is still damp
- Lock in benefits with moisturizer
- Use within your regular skincare routine
Storage guidelines: Most DIY masks should be used immediately. If you must store, keep in an airtight glass container in the refrigerator for no more than 3 days. Discard if you notice any color change or smell.
Frequently Asked Questions
How often should I use these DIY face masks?
Use most masks 2-3 times per week, except bentonite clay which should be limited to 1-2 times weekly to prevent over-drying. Your skin needs 48 hours between treatments to fully absorb benefits and avoid irritation.
Can I use these masks if I have acne?
Yes, the green tea aloe and bentonite clay masks specifically target acne-prone skin. Avoid applying masks over active, inflamed breakouts—work around them instead. The honey oat mask can help calm inflammation from acne.
How long do results last?
Immediate glow typically lasts 1-3 days. Consistent use over 4-6 weeks produces longer-lasting improvements in texture, tone, and overall skin health. Natural ingredients work gradually by supporting your skin’s natural renewal processes.
Are these masks safe during pregnancy?
Most are safe, but consult your healthcare provider before using turmeric masks during pregnancy, as some sources suggest limiting turmeric intake. The honey oat and avocado oat masks are generally considered the safest options.
Can I substitute ingredients?
Some substitutions work: Greek yogurt for regular yogurt, maple syrup for honey (though honey has unique antibacterial properties), or store-bought aloe gel for fresh aloe. Avoid substituting the primary active ingredient in each mask.
Why does my skin look red after a mask?
Mild, temporary redness is normal from increased circulation. Persistent redness, burning, or itching indicates irritation—remove the mask immediately, rinse thoroughly, and apply a gentle moisturizer. Reduce application time or frequency next use.
Can I use these masks on my neck and chest?
Yes, the skin on your neck and chest benefits from the same treatments as your face. Apply masks to these areas using the same timing and removal methods.
Do I need to use all five masks?
No. Choose the 1-2 masks that address your primary concerns and rotate them. You don’t need to use all five unless you’re addressing multiple skin issues simultaneously through multi-masking.
What if I have sensitive skin but also breakouts?
Start with the honey oat mask to build your skin’s tolerance, then gradually introduce the green tea aloe mask once weekly. Monitor your skin’s response and adjust frequency accordingly.
Can teenagers use these masks?
Yes, these masks are safe for teenage skin. The green tea aloe and bentonite clay masks work particularly well for adolescent acne, while the honey oat mask helps with sensitivity from harsh acne treatments.
Should I steam my face before applying a mask?
Steaming opens pores and can enhance absorption, but it’s not necessary. If you steam, limit to 5 minutes and ensure the steam isn’t too hot, which can cause broken capillaries.
Can I apply makeup after using a mask?
Wait at least 30 minutes after removing a mask before applying makeup. This gives your skin time to fully absorb the treatment benefits and return to its normal pH balance.
Conclusion
These 5 DIY face masks for glowing skin give you targeted solutions for every skin concern—from brightening uneven tone to calming sensitivity. The turmeric yogurt mask addresses discoloration and redness, the avocado oat formula repairs dry, compromised barriers, the green tea aloe blend detoxifies combination skin, the honey oat mixture soothes reactive skin, and the bentonite clay treatment clarifies congestion.
Your next steps:
- Identify your primary skin concern right now (it may change seasonally)
- Gather ingredients for your chosen mask—most are already in your kitchen
- Perform a patch test 24 hours before full application
- Apply your selected mask 2-3 times this week
- Track your results in a simple journal or phone notes
- Adjust frequency and formula based on your skin’s response
Start with one mask and master it before adding others to your routine. Consistency matters more than variety when it comes to seeing real improvements in your skin’s health and glow.
Natural ingredients work with your skin’s biology, not against it. By choosing the right mask for your current need, you’re supporting your skin’s natural ability to heal, renew, and radiate health. For more natural wellness approaches, explore The Herbal Handbook for additional herbal remedies and skincare guidance.
References
[1] Natural Face Masks For Glowing Skin – https://www.sacredrituel.com/blogs/glowing-skin/natural-face-masks-for-glowing-skin
[2] The 9 Best Diy Face Mask Recipes For Glowing Skin – https://vanityhero.com/the-9-best-diy-face-mask-recipes-for-glowing-skin/
[3] Diy Homemade Face Mask How To – https://www.elle.com/beauty/makeup-skin-care/a23880455/diy-homemade-face-mask-how-to/