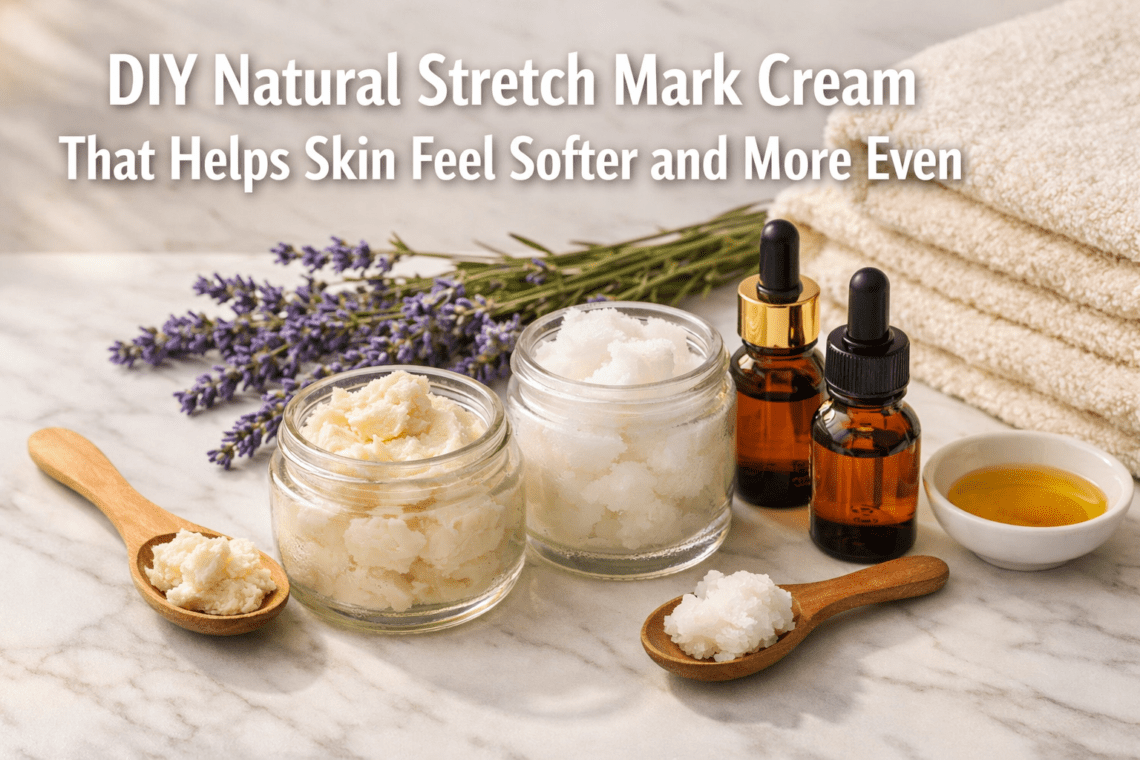
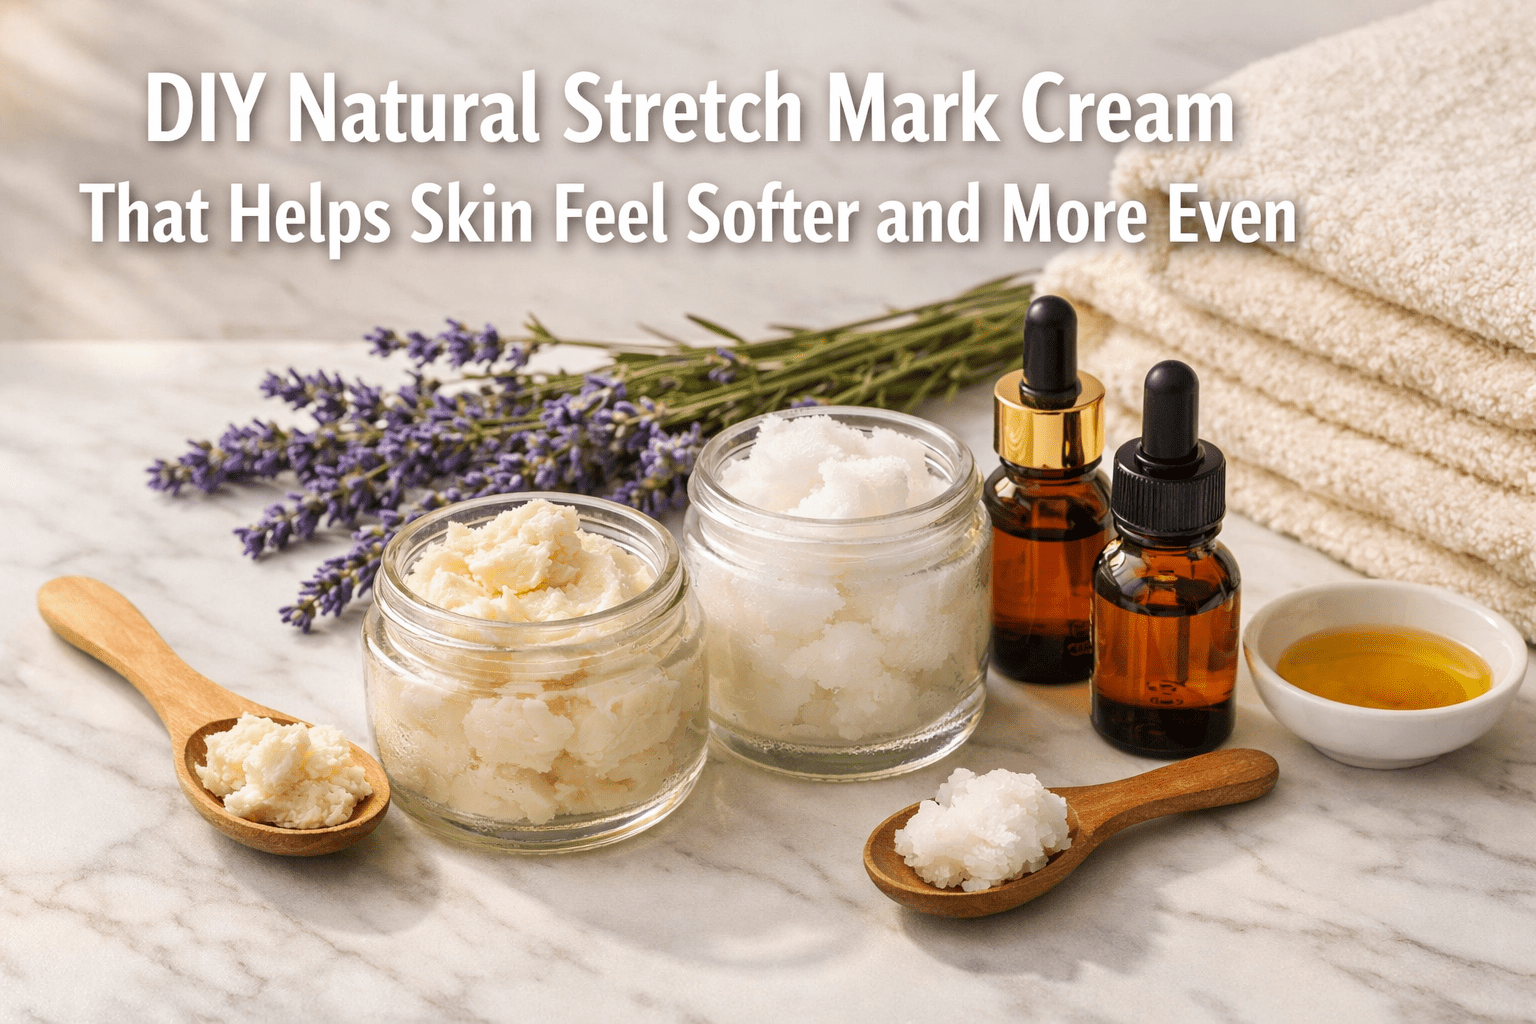
Making your own DIY natural stretch mark cream gives you complete control over what touches your skin while creating a nourishing treatment that actually works. This homemade cream combines ingredients like shea butter, coconut oil, and rosehip oil to deeply moisturize skin, improve texture, and help stretch marks feel softer and less noticeable over time.
Key Takeaways
- DIY natural stretch mark cream uses simple ingredients like shea butter, coconut oil, and vitamin E that penetrate deeply to moisturize and soften skin
- Rosehip oil and argan oil provide fatty acids and vitamin A that support cell regeneration and skin elasticity
- Making your own cream costs less than store-bought versions and contains no synthetic additives or preservatives
- The double boiler method prevents overheating delicate oils and maintains their beneficial properties
- Daily application after showering delivers the best results, with many users noticing softer skin within days
- Homemade stretch mark cream stays fresh for about two months when stored in dark glass containers at room temperature
- This cream works as an all-purpose body moisturizer for dry or mature skin, not just for stretch marks
Quick Answer
DIY natural stretch mark cream combines moisturizing butters (shea, cocoa), penetrating oils (coconut, rosehip, argan), and vitamin E to create a nourishing treatment that helps skin feel softer and more even. The cream won’t erase existing stretch marks completely, but regular application can improve skin texture, boost elasticity, and make marks less noticeable. You’ll melt the butters and oils together using a double boiler, cool the mixture, add essential oils, then whip it into a smooth cream that absorbs quickly without feeling greasy.
What Makes DIY Natural Stretch Mark Cream Effective?
DIY natural stretch mark cream works because it delivers deep moisture and skin-supporting nutrients through ingredients that actually penetrate the skin barrier. Unlike many commercial products that sit on the surface, homemade formulations use oils and butters with small molecular structures that absorb effectively.
The key ingredients each serve specific purposes:
- Coconut oil penetrates skin more deeply than average products because of its low molecular weight and ability to bond with skin proteins[1]
- Shea butter supports tissue cell regeneration and helps soften skin, with research in the Journal of Oleo Science showing it can reduce skin inflammation[1]
- Rosehip oil absorbs quickly and delivers naturally occurring vitamin A plus fatty acids that support cell regeneration and scar treatment[2]
- Argan oil provides powerful antioxidants and fatty acids that help maintain and repair skin elasticity while absorbing quickly[2]
- Vitamin E oil protects skin and adds extra moisturizing benefits that appear in nearly every effective DIY formulation[1][3]
Choose DIY cream if you prefer knowing exactly what’s in your skincare, want to avoid synthetic preservatives, or find commercial stretch mark products too expensive for daily use.
One common mistake is expecting overnight results. Stretch marks form in the deeper skin layers, so any topical treatment requires consistent daily application over weeks or months to show improvement. The cream helps skin feel softer and more supple right away, but visible changes to stretch marks take time and patience.
If you’re interested in other natural skincare solutions, check out our DIY turmeric butter for skin for another nourishing recipe.
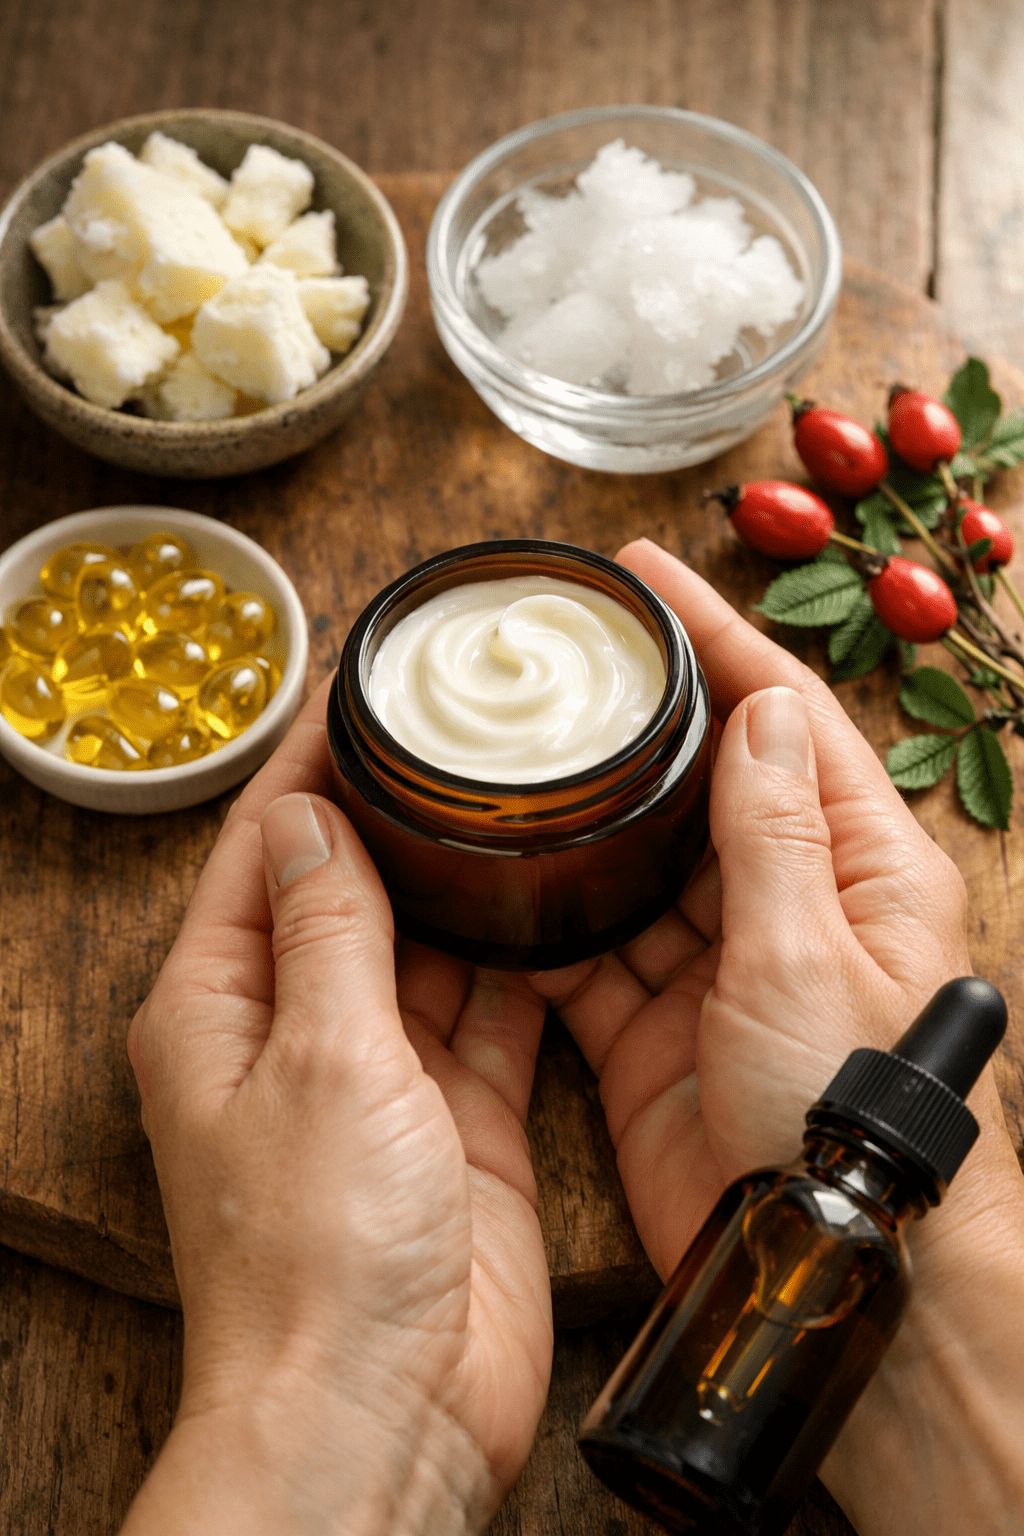
What Ingredients Do You Need for DIY Natural Stretch Mark Cream?
You need just six to eight simple ingredients to make effective natural stretch mark cream: shea butter, coconut oil, a specialty oil (rosehip or argan), vitamin E, and optional essential oils for scent and skin benefits.
Here’s what to gather:
Base ingredients:
- ¼ cup shea butter (raw, unrefined works best)
- ¼ cup coconut oil (virgin, cold-pressed)
- 2-3 tablespoons rosehip oil OR argan oil
- 1 tablespoon vitamin E oil (or 10-12 vitamin E capsules, pierced)
Optional additions:
- 10-15 drops lavender essential oil (antimicrobial and antioxidant properties)[1][2]
- 5-10 drops frankincense essential oil (supports skin regeneration)
- 1 tablespoon cocoa butter (for extra richness, though Cleveland Clinic notes cocoa butter alone isn’t proven effective for stretch marks)[7]
Equipment needed:
- Double boiler or heat-safe glass bowl over a pot
- Hand mixer or whisk
- Dark glass jar with lid (4-6 oz capacity)
- Measuring cups and spoons
Choose rosehip oil if you want faster absorption and are focusing on scar treatment and cell regeneration. Pick argan oil if you have very dry skin or want extra antioxidant protection.
The most common mistake is using refined or processed versions of these ingredients. Refined shea butter and regular coconut oil lose many beneficial compounds during processing. Always buy raw, unrefined, cold-pressed versions when possible.
For more natural skincare recipes, explore our complete DIY skincare collection.
How Do You Make DIY Natural Stretch Mark Cream Step-by-Step?
Making natural stretch mark cream involves melting butters and oils together in a double boiler, cooling the mixture, adding heat-sensitive ingredients, then whipping everything into a smooth cream. The entire process takes about 30 minutes, plus 1-2 hours of cooling time.
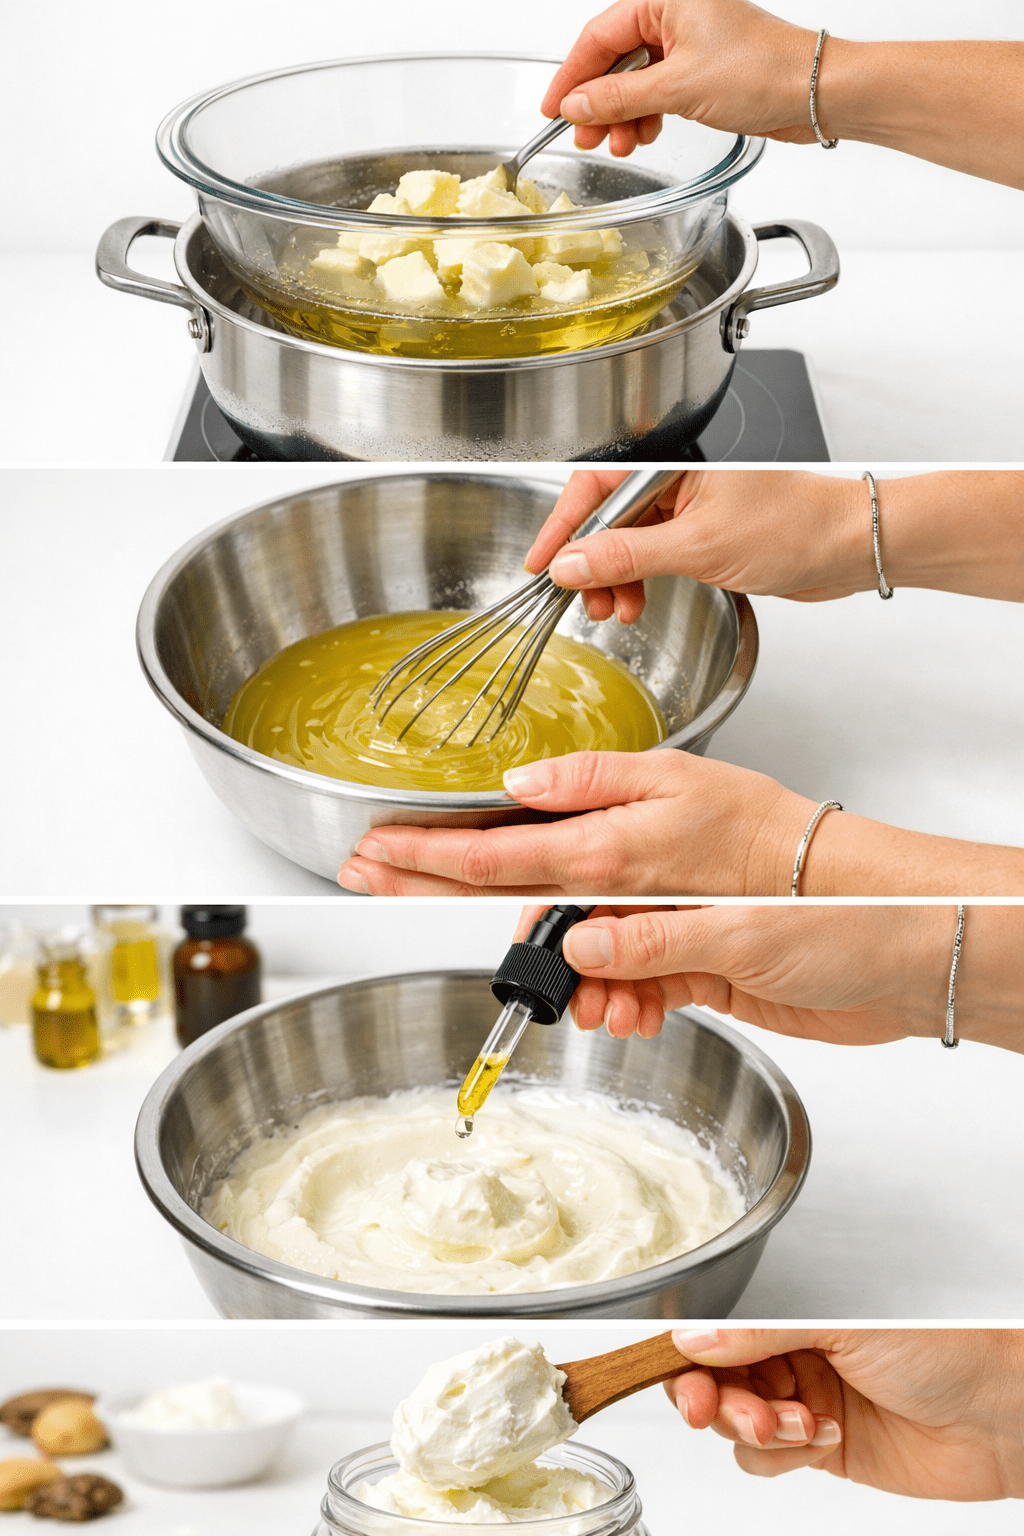
Step 1: Set up your double boiler
Fill a pot with 2 inches of water and bring to a simmer. Place a heat-safe glass bowl on top, making sure the bottom doesn’t touch the water.
Step 2: Melt the butters and oils
Add shea butter and coconut oil to the bowl. Stir occasionally until completely melted (about 5-7 minutes). Remove from heat and stir in your specialty oil (rosehip or argan)[2][3].
Step 3: Cool the mixture
Transfer the bowl to your counter or refrigerator. Let it cool to room temperature until it starts to solidify around the edges but remains soft in the center. This usually takes 1-2 hours at room temperature or 30-45 minutes in the fridge.
Step 4: Add vitamin E and essential oils
Once cooled, add vitamin E oil and your chosen essential oils. These ingredients break down with heat, so adding them now preserves their benefits[2].
Step 5: Whip the cream
Using a hand mixer or whisk, beat the mixture for 3-5 minutes until it becomes light, fluffy, and resembles whipped butter. The texture should be smooth and easily spreadable.
Step 6: Store properly
Spoon the finished cream into a clean, dark glass jar. Store at room temperature away from direct sunlight. The cream stays fresh for about two months[1].
Common mistake: Whipping the mixture while it’s still too warm creates a runny consistency that won’t thicken properly. If this happens, refrigerate for 15 minutes and whip again.
Edge case: In very hot climates (above 80°F), your cream may soften too much. Store it in the refrigerator and let it sit at room temperature for a few minutes before applying.
Similar to our DIY anticellulite cream, this recipe uses the whipping method to create a luxurious texture.
How Should You Apply DIY Natural Stretch Mark Cream for Best Results?
Apply your DIY natural stretch mark cream once or twice daily to clean, slightly damp skin, using gentle circular motions to massage it into areas with stretch marks or areas prone to developing them. The best time is right after showering when your pores are open and skin absorbs moisture more effectively.
Application routine:
- Shower or bathe to clean and warm your skin
- Pat dry but leave skin slightly damp
- Scoop out a quarter-size amount of cream
- Massage into stretch marks using circular motions for 1-2 minutes
- Let absorb for a few minutes before dressing
Target these common areas:
- Belly and hips (especially during or after pregnancy)
- Thighs and buttocks
- Breasts and upper arms
- Lower back
Most users report softer, more supple skin within a few days of daily application[2]. Visible improvement in stretch mark appearance typically takes 4-8 weeks of consistent use.
Choose morning application if you want the cream to work under clothing throughout the day. Choose evening application if you prefer letting it absorb overnight without worrying about clothing.
Common mistakes to avoid:
- Applying to dry skin reduces absorption significantly
- Using too little cream won’t provide enough moisture for deep penetration
- Skipping days breaks the consistency needed for visible results
Edge case: During pregnancy, always check with your healthcare provider before using essential oils, as some aren’t recommended. You can make the cream without essential oils and still get excellent moisturizing benefits.
This cream also works beautifully as an all-purpose body moisturizer for dry or mature skin, not just for stretch marks[2]. I use it on my elbows and knees during winter months.
For other targeted skincare solutions, try our homemade eye cream for dark circles.
Can DIY Natural Stretch Mark Cream Actually Reduce Stretch Marks?
DIY natural stretch mark cream can improve skin texture and make stretch marks feel softer and less noticeable, but it won’t completely erase existing marks. Stretch marks form when the middle layer of skin (dermis) tears due to rapid stretching, and no topical cream can fully repair that structural damage.
Here’s what the cream can realistically do:
Proven benefits:
- Deeply moisturizes skin to improve overall texture and appearance
- Supports skin elasticity through fatty acids and vitamin A
- May help prevent new stretch marks from forming during pregnancy or weight changes
- Makes existing marks feel softer and blend better with surrounding skin
- Reduces the red or purple color of new stretch marks as they fade naturally
What it can’t do:
- Completely remove old, silver-white stretch marks
- Repair torn collagen fibers in the dermis
- Work faster than consistent daily application over weeks or months
Research from 2017 suggests hyaluronic acid may improve stretch mark appearance when applied daily to affected areas, though more research is needed[6]. Cleveland Clinic notes that cocoa butter alone isn’t effective for stretch marks, and tretinoin (a prescription retinoid) may be more effective for newer marks[7].
Choose DIY cream if you want to improve skin health and texture while potentially reducing the appearance of marks. Consider medical treatments if you want more dramatic results and are willing to invest in procedures like laser therapy or microneedling.
The realistic expectation is that your skin will feel noticeably softer and more nourished, stretch marks may fade slightly and blend better, but complete removal isn’t likely from any topical treatment alone.
How Long Does Homemade Stretch Mark Cream Last?
Homemade stretch mark cream stays fresh for about two months when stored properly in a dark glass container at room temperature. Without synthetic preservatives, natural ingredients have a shorter shelf life than commercial products, but proper storage maximizes freshness.
Storage guidelines:
| Storage Method | Shelf Life | Best For |
|---|---|---|
| Dark glass jar, room temp (65-75°F) | 2 months | Most climates |
| Refrigerator | 3 months | Hot, humid climates |
| Freezer | 6 months | Long-term storage |
Signs your cream has gone bad:
- Rancid or sour smell (oils have oxidized)
- Separated layers that don’t remix when stirred
- Mold or discoloration
- Grainy texture that wasn’t there initially
Extend shelf life by:
- Using clean, dry hands or a small spatula to scoop cream (never dip wet fingers in)
- Keeping the jar tightly sealed when not in use
- Storing away from heat sources and direct sunlight
- Making smaller batches if you won’t use it within two months
Common mistake: Storing in clear plastic containers exposes the cream to light and may leach chemicals from the plastic. Always use dark glass jars.
Edge case: If you live in a very hot climate and your cream melts frequently, store it in the refrigerator. Let it sit at room temperature for 5-10 minutes before applying so it spreads easily.
Making smaller batches more frequently ensures you’re always using fresh cream with maximum potency. I make a new batch every 6-8 weeks and keep it on my bathroom counter in an amber glass jar.
For other natural remedies with similar storage considerations, see our guide on calendula recipes for skin care.
What Are Common Variations of DIY Natural Stretch Mark Cream?
You can customize DIY natural stretch mark cream by swapping oils, adding specialty ingredients, or adjusting the texture to match your preferences and skin type. The basic formula of butters plus oils plus vitamin E remains the same, but variations let you target specific concerns.
Popular variations:
For extra-dry skin:
- Add 2 tablespoons cocoa butter to the base recipe
- Replace half the coconut oil with sweet almond oil
- Include 1 tablespoon jojoba oil for added moisture
For sensitive skin:
- Skip essential oils entirely
- Use only shea butter and coconut oil for a simpler formula
- Add 1 tablespoon calendula-infused oil for gentle soothing
For better absorption:
- Replace coconut oil with fractionated coconut oil (stays liquid)
- Add 1 tablespoon grapeseed oil for lighter texture
- Reduce shea butter to 3 tablespoons and increase specialty oils
For pregnancy-safe version:
- Omit all essential oils or use only 5 drops of lavender
- Focus on shea butter, coconut oil, and vitamin E only
- Always consult your healthcare provider first
Essential oil alternatives:
- Geranium (supports skin regeneration)
- Neroli (improves skin elasticity)
- Helichrysum (helps with scarring)
- Carrot seed (rich in antioxidants)
Choose a lighter texture if you live in a hot climate or have oily skin. Pick a richer formula if you have very dry skin or are using it during winter months.
The beauty of making your own cream is experimenting to find what works best for your skin. Start with the basic recipe, then adjust based on how your skin responds.
For more customizable natural skincare recipes, explore our 5 DIY face masks for glowing skin.
FAQ
How much does it cost to make DIY natural stretch mark cream?
Making your own stretch mark cream costs about $15-25 for ingredients that produce 6-8 ounces of cream, which lasts 1-2 months with daily use. This is significantly cheaper than commercial natural stretch mark creams that cost $20-40 for 4 ounces.
Can I use this cream during pregnancy?
Yes, but omit essential oils or use only pregnancy-safe oils like lavender in very small amounts (5 drops maximum). Always consult your healthcare provider before using any new skincare products during pregnancy, even natural ones.
Will this cream prevent stretch marks completely?
No cream can guarantee prevention of stretch marks because genetics, rapid weight changes, and hormones all play roles. However, keeping skin deeply moisturized and supple may reduce the severity of marks that do form.
Can men use DIY natural stretch mark cream?
Absolutely. Stretch marks affect people of all genders from growth spurts, weight lifting, weight changes, or medical conditions. The cream works the same way regardless of gender.
Is this cream safe for children?
The base recipe without essential oils is safe for children’s skin. If adding essential oils, reduce the amount by half for children under 12 and always do a patch test first.
Can I add other ingredients like aloe vera or hyaluronic acid?
Yes, you can add 1-2 tablespoons of aloe vera gel before whipping, though it may reduce shelf life slightly. Hyaluronic acid powder can be mixed in at 1/4 teaspoon, but it works best when dissolved in a tiny amount of water first.
Why did my cream turn grainy?
Graininess happens when shea butter melts and cools too quickly, forming crystals. To fix it, remelt the entire batch gently, let it cool very slowly at room temperature, then whip again.
Can I use this cream on my face?
While the ingredients are safe for facial use, the heavy texture may clog pores for some people. Test on a small area first, or make a lighter version with less shea butter for facial application.
How is DIY cream different from store-bought versions?
Homemade cream contains no synthetic preservatives, fragrances, or fillers. You control ingredient quality and freshness. Store-bought versions last longer but often include additives that some people prefer to avoid.
What if I don’t have a double boiler?
Place a heat-safe glass or metal bowl over a pot of simmering water, making sure the bowl doesn’t touch the water. This creates the same gentle, indirect heat as a double boiler.
Can this cream help with other types of scars?
The moisturizing and skin-supporting ingredients may help improve the appearance of other scars, though results vary. Rosehip oil is particularly known for scar treatment benefits.
Should I apply this cream before or after lotion?
This cream replaces regular body lotion for the areas where you apply it. It’s thick and moisturizing enough to be your only moisturizer for those areas.
Conclusion
Making your own DIY natural stretch mark cream puts effective, nourishing skincare in your hands without synthetic additives or high costs. This simple combination of shea butter, coconut oil, specialty oils, and vitamin E creates a luxurious treatment that helps skin feel softer, more supple, and better moisturized.
Your next steps:
- Gather your ingredients, focusing on raw, unrefined versions for maximum benefits
- Make your first batch using the basic recipe, then customize based on your skin’s response
- Apply daily after showering for at least 4-8 weeks to see noticeable improvements
- Store properly in dark glass containers and make fresh batches every two months
Remember that while this cream won’t completely erase existing stretch marks, it provides real benefits for skin health, texture, and moisture. Many users notice softer skin within days and gradual improvement in stretch mark appearance over weeks of consistent use.
Start with the basic recipe today and discover how simple, natural ingredients can transform your skincare routine. Your skin will thank you for the nourishing attention.
References
[1] Stretch Mark Cream – https://draxe.com/beauty/stretch-mark-cream/
[2] Homemade Stretch Mark Cream – https://www.savvyhomemade.com/homemade-stretch-mark-cream/
[3] Diy Stretch Mark Cream – https://vitruvi.com/blogs/recipes/diy-stretch-mark-cream
[6] Home Remedies For Stretch Marks – https://www.healthline.com/health/home-remedies-for-stretch-marks
[7] Stretch Marks Hold The Cocoa Butter – https://health.clevelandclinic.org/stretch-marks-hold-the-cocoa-butter