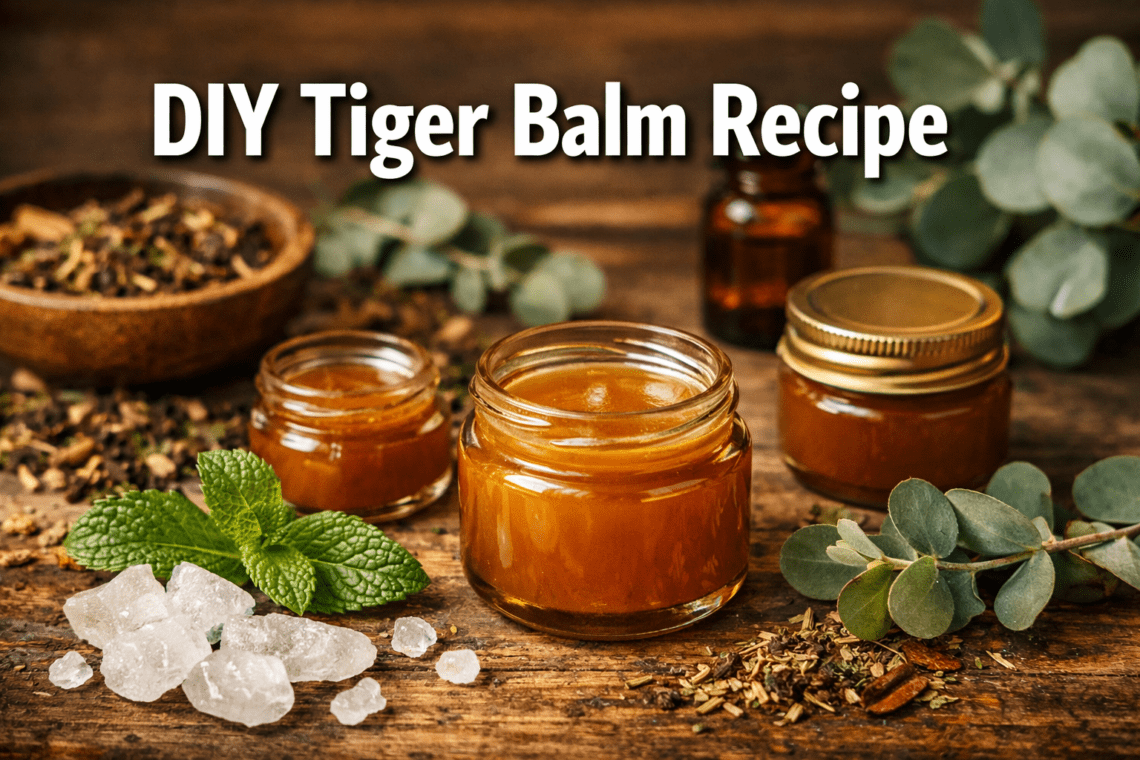

Quick Answer: A DIY Tiger Balm recipe combines beeswax, a carrier oil (like olive or coconut oil), and six key essential oils — camphor, menthol, peppermint, eucalyptus, clove, and cajeput — melted together and poured into small glass jars. The whole process takes about 20 minutes, costs a fraction of the store-bought version, and skips the petroleum-based ingredients found in commercial balms. Use a pea-sized amount on temples for headaches, sore muscles for pain relief, or your chest and under your nose during cold season.
Key Takeaways
- A standard DIY Tiger Balm recipe uses beeswax (1.5–2 tablespoons), a carrier oil (¼–½ cup), and six essential oils [1][2][3]
- Red Tiger Balm targets muscle pain and strains; white Tiger Balm is better for respiratory and cold season relief [5]
- Essential oils make up roughly 50% of the balm’s composition by active effect — add them after the wax mixture cools slightly to preserve potency [3]
- Menthol crystals can replace menthol essential oil; use them at about 8% of the recipe by weight and melt them in with the carrier oils [3]
- Always store in glass containers — high essential oil concentrations can degrade plastic [3][5]
- A single batch produces 2–4 small tins or jars, enough to last several weeks with regular use
- Keep the balm away from eyes, broken skin, and mucous membranes; do a patch test first if you have sensitive skin
- Children under 2 and pregnant women should avoid camphor and menthol products without medical guidance
What Makes a DIY Tiger Balm Recipe Work?

The original Tiger Balm formula relies on camphor (11%), menthol (10%), cajuput oil, cassia oil, and clove oil to create its signature warming and cooling sensation [1]. A homemade version replicates this using essential oils and natural beeswax instead of petroleum-based ingredients.
The science behind it is straightforward. Menthol and peppermint trigger cold receptors in the skin, creating a cooling effect that distracts from pain. Camphor adds a warming counterbalance. Eucalyptus and cajeput open airways, which is why the balm works so well during cold season. Clove oil brings mild analgesic properties to the mix.
Why make it yourself?
- You control every ingredient (no parabens, no petrolatum)
- You can adjust the intensity of each oil to suit your needs
- It costs significantly less per batch than buying commercial balm
- You can customize it — add cassia and cinnamon leaf for a stronger red-style muscle balm, or keep it lighter for a white-style respiratory blend [5]
Red vs. White: Which DIY Tiger Balm Recipe Should You Make?
Choose red if you’re dealing with muscle soreness, joint aches, strains, or sports recovery. Choose white if you want relief from headaches, nasal congestion, or cold symptoms.
| Feature | Red Tiger Balm | White Tiger Balm |
|---|---|---|
| Primary use | Muscle pain, strains, sprains | Headaches, colds, congestion |
| Extra oils | Cassia, cinnamon leaf | None (lighter blend) |
| Sensation | Stronger warming effect | Balanced cool/warm |
| Carrier oil option | St. John’s Wort oil | Olive or coconut oil |
| Skin feel | More intense | Milder, good for temples |
The red version includes cassia and cinnamon leaf essential oils on top of the base blend, which increases the warming sensation and makes it better suited for deep muscle relief [5]. If you’re new to making balms, start with the white version — it’s gentler and more versatile.
Ingredients You’ll Need
Here’s the core ingredient list for a standard white-style DIY Tiger Balm recipe. This makes approximately 2–4 small jars.
Base:
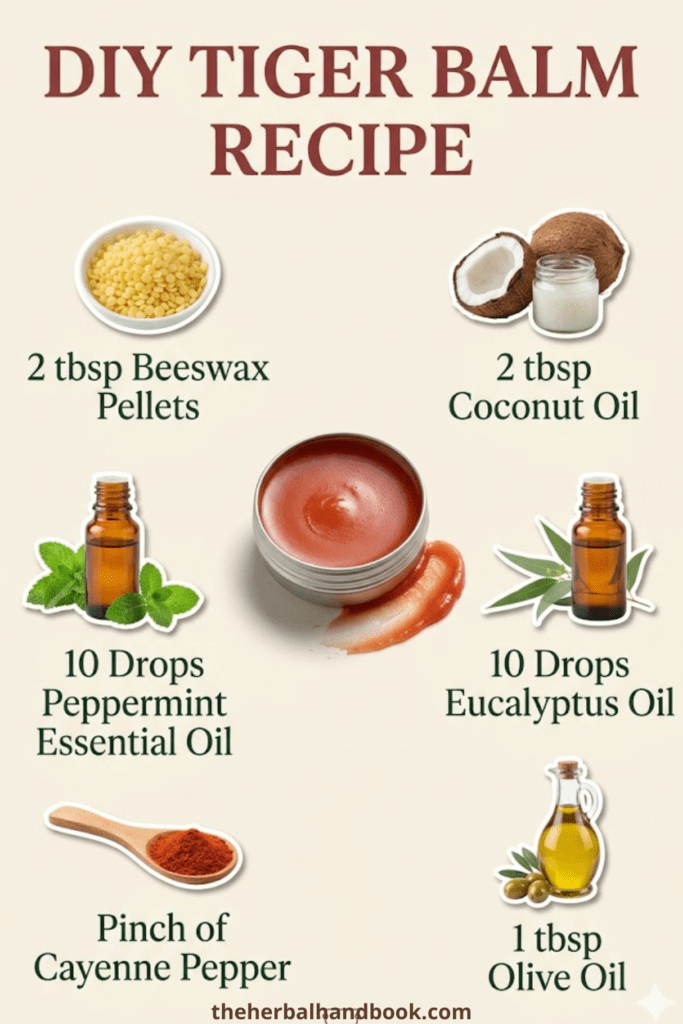
- ¼ cup olive oil (or coconut oil) [1][2]
- 1.5–2 tablespoons beeswax pellets [2][3]
- Optional: 10g cocoa butter or shea butter for a creamier texture [3][6]
Essential oils:
- Camphor essential oil: 5–25 drops [1][2]
- Menthol essential oil OR menthol crystals (at ~8% by weight): 4–12 drops [3]
- Peppermint essential oil: 8–25 drops [1][2]
- Eucalyptus essential oil: up to 25 drops [1][2]
- Clove essential oil: 7–9 drops [1][2]
- Cajeput essential oil: 8–15 drops [1][2]
For a red-style muscle balm, add:
- Cassia essential oil: 5–10 drops
- Cinnamon leaf essential oil: 5–8 drops [5]
💡 Pro tip: Start with the lower end of each essential oil range on your first batch. You can always make the next batch stronger once you know how your skin responds.
Step-by-Step: How to Make Your DIY Tiger Balm Recipe
This process takes about 20 minutes, plus cooling time.
What you’ll need:
- Double boiler (or a heatproof bowl over a saucepan)
- Kitchen scale or measuring spoons
- Small glass jars or tins with lids
- A toothpick or small spatula for stirring
Steps:
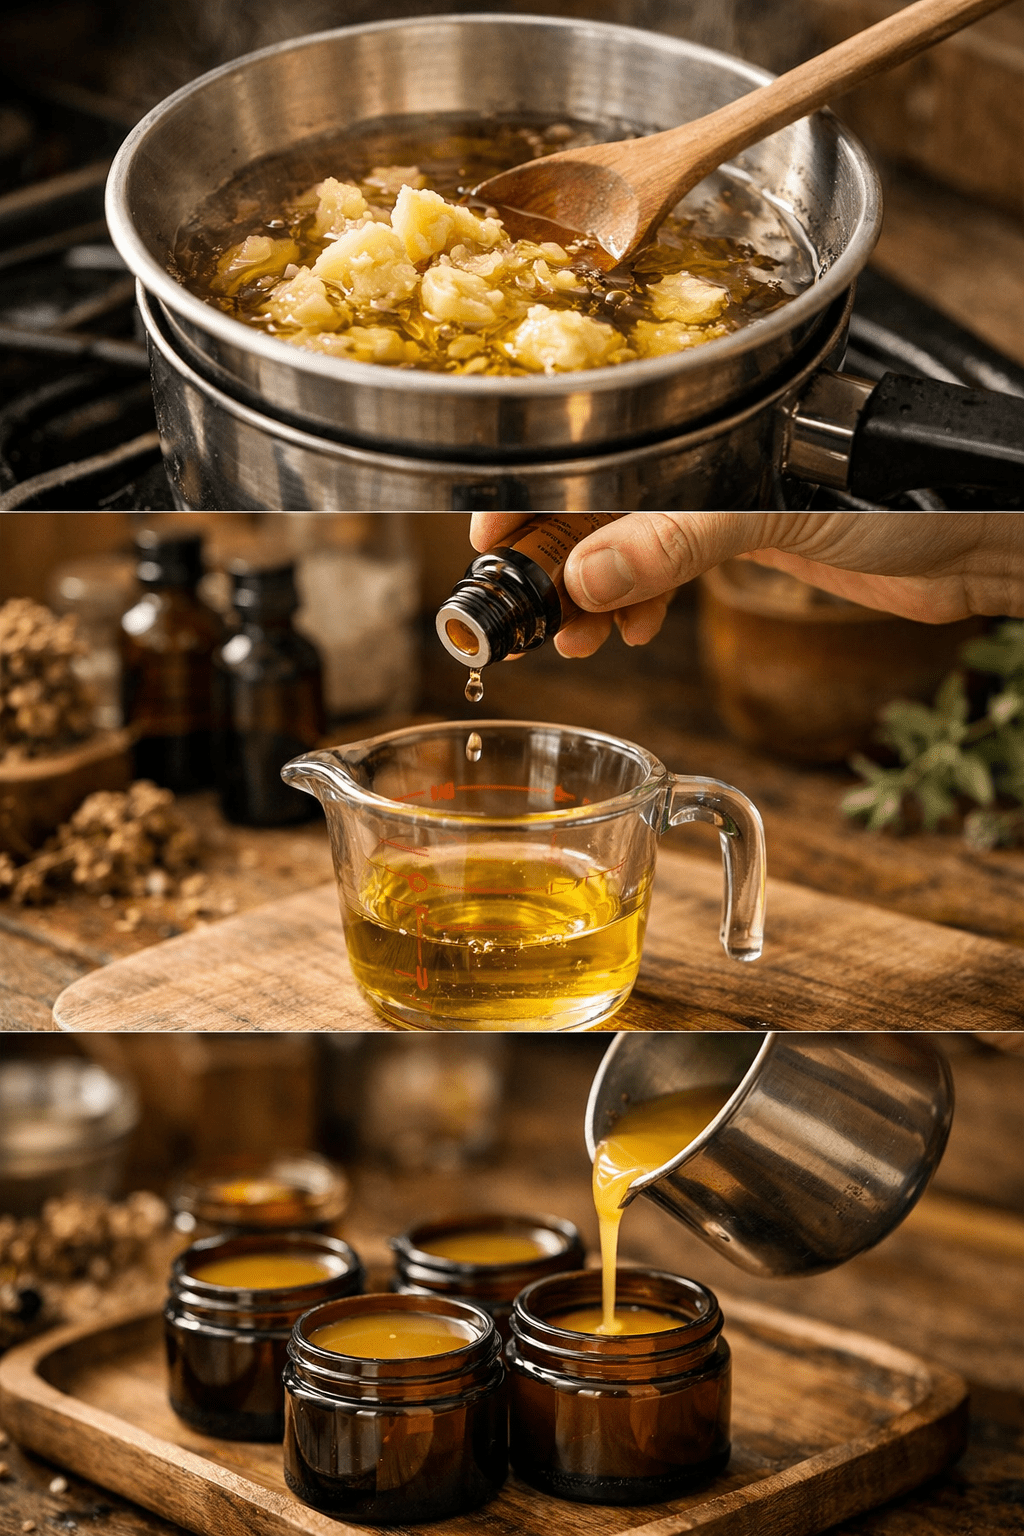
- Set up your double boiler. Fill a small saucepan with 2–3 inches of water and bring it to a gentle simmer. Place a heatproof bowl or smaller pot on top.
- Melt the beeswax and carrier oil together. Add your beeswax pellets and olive oil (plus cocoa butter if using) to the bowl. Stir gently as they melt. The mixture needs to reach about 60°C to fully combine [3].
- If using menthol crystals, add them at this stage — they need heat to dissolve properly. Stir until fully melted [3].
- Remove from heat and let it cool slightly. Wait 2–3 minutes. You want the mixture warm but not steaming before you add the essential oils.
- Add your essential oils. Drop them in one at a time and stir well after each addition. Adding oils to a too-hot mixture will evaporate their active compounds.
- Pour into glass jars immediately. Work quickly — the balm starts to set as it cools. Fill each jar to just below the rim.
- Let cool completely at room temperature (30–60 minutes) before putting lids on. Don’t move the jars while they’re setting.
- Label your jars with the date and contents.
How to Use Your Homemade Tiger Balm
Apply a pea-sized amount to the affected area and massage gently. You can reapply every few hours as needed, up to 3–4 times daily [2][5].
For headaches: Rub a small amount into your temples and the back of your neck. Avoid getting it near your eyes — the menthol and camphor will cause serious irritation. If you want more targeted headache relief options, this DIY headache balm recipe is another great option to have on hand.
For sore muscles: Work the balm into tight or achy areas with firm circular motions. The warming oils penetrate better with a little friction. For a deeper muscle relief option, check out this DIY warming muscle rub recipe.
For cold season: Apply a small amount under your nose (not inside), on your chest, or on the back of your neck. The eucalyptus and cajeput oils help open congested airways. You can also pair this with a natural sinus chest rub for extra relief.
Common mistakes to avoid:
- Don’t apply to broken or irritated skin
- Don’t use on children under 2 without medical advice
- Don’t apply near eyes, nose openings, or mouth
- Don’t store in plastic containers — the essential oil concentration can degrade them [3][5]
Storage, Shelf Life, and Troubleshooting
Store your finished balm in dark glass jars with tight-fitting lids, away from direct sunlight and heat [3][5]. A bathroom drawer or medicine cabinet works well.
Shelf life: Most batches last 6–12 months when stored properly. The carrier oil is usually the limiting factor — olive oil has a shorter shelf life than fractionated coconut oil.
Troubleshooting common issues:
| Problem | Likely cause | Fix |
|---|---|---|
| Balm is too hard | Too much beeswax | Remelt and add more oil |
| Balm is too soft/greasy | Too little beeswax | Remelt and add more pellets |
| Weak scent/effect | Essential oils added too hot | Make a new batch; add oils cooler |
| Grainy texture | Cooled too fast or unevenly | Remelt slowly and pour at a steadier temp |
If you’re interested in making other natural pain relief options, this DIY pain relief salve recipe uses a similar base and is ready in about 15 minutes.
Who Should (and Shouldn’t) Use This Balm

This balm is a good fit for:
- Adults dealing with tension headaches, sore muscles, or seasonal congestion
- People who prefer natural, petroleum-free topical remedies
- Anyone looking to reduce dependence on over-the-counter pain creams
Use with caution or avoid if:
- You’re pregnant or breastfeeding (camphor in particular raises concerns)
- You have asthma or are sensitive to strong aromatic compounds
- You’re applying to children under 2 (camphor and menthol are contraindicated)
- You have sensitive or reactive skin (always patch test first)
If you’re exploring natural headache relief more broadly, this guide on natural remedies for a sinus headache covers complementary approaches worth trying alongside your balm. And for cold season support from the inside out, these immunity shots for cold pair well with topical relief.
FAQ
How long does a batch of DIY Tiger Balm last?
One standard batch (¼ cup carrier oil + 1.5–2 tbsp beeswax) fills 2–4 small jars. With regular use, a single jar typically lasts 3–6 weeks.
Can I use coconut oil instead of olive oil?
Yes. Coconut oil works well and has a longer shelf life. Fractionated coconut oil stays liquid at room temperature, which gives the balm a slightly softer texture [1][2].
What’s the difference between menthol crystals and menthol essential oil?
Menthol crystals are more concentrated and need to be melted into the carrier oil during heating. Menthol essential oil can be added after the mixture cools slightly. Both work — crystals give a stronger, longer-lasting effect [3].
Can I skip camphor if I can’t find it?
You can, but the balm will feel noticeably different. Camphor provides the characteristic warming depth. If you skip it, increase peppermint slightly to compensate, though the effect won’t be identical.
Is this safe to use on children?
Not for children under 2. For older children, use a very diluted version and avoid the face area entirely. When in doubt, consult a pediatrician before applying camphor or menthol products to kids.
Why does my balm smell weaker after a week?
Essential oils are volatile and can evaporate if the lid isn’t sealed tightly or if the jar is stored somewhere warm. Keep lids on tight and store away from heat and light.
Can I add other essential oils to customize it?
Yes. Lavender adds a calming note and is good for headache blends. Rosemary can enhance the muscle-warming effect. Just keep total essential oil additions within a safe range (generally under 3% of total recipe weight for facial use, up to 5% for body use).
Does this work as well as store-bought Tiger Balm?
Many people find homemade versions just as effective, and some prefer them because they can adjust the intensity. The key active compounds — camphor, menthol, eucalyptus, and clove — are the same in both [1].
Conclusion
Making your own DIY Tiger Balm recipe is one of the most practical natural remedies you can keep in your home. It takes about 20 minutes, uses ingredients you can find at most health food stores or online, and gives you a versatile balm that handles headaches, muscle soreness, and cold season congestion without synthetic additives.
Your next steps:
- Decide whether you want a white (respiratory/headache) or red (muscle pain) version
- Gather your ingredients — beeswax, olive or coconut oil, and the six core essential oils
- Make a small test batch first so you can adjust the consistency and scent strength before committing to a larger batch
- Store in glass jars, label with the date, and keep a jar at your desk and one in your medicine cabinet
If you want to expand your natural remedy toolkit, explore this DIY pain relief salve recipe or check out the full natural remedies category for more ideas. Once you’ve made your first balm, you’ll wonder why you ever bought the commercial version.
References
[1] DIY Tiger Balm – https://jenniraincloud.com/diy-tiger-balm/
[2] DIY Tiger Balm – https://www.thesunshinehustle.com/making/diy-tiger-balm
[3] Homemade White Tiger Balm – https://www.humblebeeandme.com/homemade-white-tiger-balm/
[4] Fierce Tigress Body Balm – https://sunset.com/recipe/fierce-tigress-body-balm
[5] Homemade Red Tiger Balm – https://thepracticalherbalist.com/healthy-recipes/herbal-remedies/homemade-red-tiger-balm/
[6] Recipe – https://www.fromnaturewithlove.com/recipe/recipe.asp?recipe_id=36